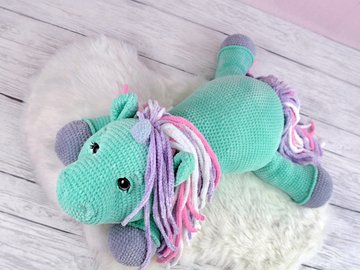
Materials:
Same thickness yarn of your choice (acrylic, cotton). I used acrylic yarn, 400 m/100 g. The height of my fairy-tale mushroom house is 12 cm. Depending on the thickness of yarn a finished toy size may differ.
Yarn of the following colours is required:
For the mushroom – the main colour is light pink (or light yellow, beige, white) - approx. 10 gr
For the mushroom cap – an additional colour. This can be any bright colour (lilac, purple, red, pink, light blue, blue) – approx. 10 gr
For the stand – brown –approx. 10 gr
The rest of the colorus (the colour of your choice) will need a little, 2 - 20 meters.
For windows, doors and chimneys - blue and 2 more matching colours (colour A and B)
For grass and flowers – green, yellow and several bright colours.
For the butterfly – brown (choose a little thinner yarn than the main yarn) and 2 more matching colours (colour C and D)
- - A crochet hook, I used 1,25 mm crochet hook
- - thin wire (I used beading wire) approx. 40 cm – for flower stems
- - A piece of wire approx. 1,0 mm thick and 4 cm long – for the door handle
- - A sewing needle
- - Hollow fibre for stuffing
- - 2 pieces of thick cardboard, approx. 7x7 cm and 10x10 cm
- - All purpose clear transparent glue, e.g. UHU
Abbreviations:
ch – chain
sl st – slip stitch
sc – single crochet
hdc – half double crochet
dc - double crochet
inc – increase (2 sc in 1 st)
2 inc, 3 inc – 2, 3 increases in sequence
dec – decrease (single crochet two stitches together)
2 dec, 3 dec – 2, 3 decrease in sequence
(...) x N times – repeat instructions in brackets N times
Mushroom stem
Work with main colour yarn
1 rnd. 6 sc in a Magic Ring (6)
2 rnd. (inc)х6 times (12)
3 rnd. (1 sc, inc)х6 times (18)
4 rnd. (2 sc, inc)х6 times (24)
5 rnd. (3 sc, inc)х6 times (30)
6 rnd. (4 sc, inc)х6 times (36)
7 rnd. Into the back loops only 36 sc
8-9 rnd. 36 sc
10 rnd. (8 sc, inc)х4 times (40)
11-12 rnd. 40 sc
13 rnd. (9 sc, inc)х4 times (44)
14-15 rnd. 44 sc
16 rnd. 5 sc, (inc, 10 sc )х3 times, inc, 5 sc (48)
17-19 rnd. 48 sc
20 rnd. (11 sc, inc)х4 times (52)
20-22 rnd. 52 sc
23 rnd. 6 sc, (inc, 12 sc )х3 times, inc, 6 sc (56)
24-26 rnd. 56 sc
27 rnd. (13 sc, inc)х4 times (60)
28-29 rnd. 60 sc
Fasten off, cut the thread, leaving approx. 30 cm long tail for sewing.
.jpg)
Mushroom gills
Work with main colour yarn
Crochet in rows.
Work 10 ch.
1 row. starting from 2nd ch from hook: 9 sc, ch, turn (9)
Furter crochet all rows into the back loops only!
2 row. 3 sl st, 6 sc, ch, turn (9)
3 row. 6 sc, 3 sl st, ch, turn (9)
Repeat the 2nd and 3rd rows up to the 62nd row.
63 row. Fold the part in two, work 9 sl st by hooking through both edges of the part.
Fasten off, cut the thread, leaving approx. 30 cm long tail for sewing.
.jpg)
Sew the mushroom gills to the stem of the mushroom to previously unworked front loops of the 7th round.
.jpg)
Mushroom cap
Work with yarn of your chosen additional colour.
1 rnd. 6 sc in a Magic Ring (6)
2 rnd. (inc)х6 times (12)
3 rnd. (1 sc, inc)х6 times (18)
4 rnd. (2 sc, inc)х6 times (24)
5 rnd. (3 sc, inc)х6 times (30)
6 rnd. 30 sc
7 rnd. 2 sc, (inc, 4 sc )х5 times, inc, 2 sc (36)
8 rnd. 36 sc
9 rnd. (5 sc, inc)х6 times (42)
10 rnd. (5 sc, inc)х7 times (49)
11 rnd. 3 sc, (inc, 6 sc )х6 times, inc, 3 sc (56)
12 rnd. 56 sc
13 rnd. (7 sc, inc)х7 times (63)
14 rnd. 12 sc, put an additional marker here – this is the place where the chimney will be sewn, 51 sc (63)
15 rnd. (2 sc, inc)х3 times, (8 sc, inc)х6 times (72)
16 rnd. (3 sc, inc)х3 times, (9 sc, inc)х6 times (81)
17 rnd. 81 sc
18 rnd. 5 sc, (inc, 1 sc )х3 times, ( 7 sc, inc)х8 times, 6 sc (92)
19 rnd. 17 sc, (inc, 9 sc ) х7 times, inc, 4 sc (100)
20 rnd. 100 sc
21 rnd. 5 sc, (inc, 10 sc ) х8 times, inc, 6 sc (109)
22-23 rnd. 109 sc
24 rnd. (4 sc, dec ) х18 times, 1 sc (91)
25 rnd. (2 sc, dec, 3 sc, dec ) х10 times, 1 sc (71)
Fasten off, cut the thread, leaving approx. 40 cm long tail for sewing.
.jpg)
Attach the hat to the cardboard, cut out a circle according to the size of the finished part (dotted line in the photo).
.jpg)
Add hollow fibre to the hat, insert a cardboard circle.
Then sew the hat to the stem of the mushroom with hidden stitches.
.jpg)
Stand (bottom part)
Work with brown colour yarn.
1 rnd. 6 sc in a Magic Ring (6)
2 rnd. (inc)х6 times (12)
3 rnd. (1 sc, inc)х6 times (18)
4 rnd. (2 sc, inc)х6 times (24)
5 rnd. 1 sc, (inc, 3 sc )х5 times, inc, 2 sc (30)
6 rnd. (4 sc, inc)х6 times (36)
7 rnd. (5 sc, inc)х6 times (42)
8 rnd. 3 sc, (inc, 6 sc )х5 times, inc, 3 sc (48)
9 rnd. (7 sc, inc)х6 times (54)
10 rnd. 4 sc, (inc, 8 sc )х5 times, inc, 4 sc (60)
11 rnd. (9 sc, inc)х6 times (66)
12 rnd. 5 sc, (inc, 10 sc )х5 times, inc, 5 sc (72)
Cut out a circle from a thick piece of cardboard according to the size of the finished part.
13 rnd. 3 sc, (inc, 11 sc )х5 times, inc, 6 sc, 2 sl st (78)
Fasten off, cut off.
Stand (upper part)
Work with brown colour yarn.
1 rnd. 6 sc in a Magic Ring (6)
2 rnd. (inc)х6 times (12)
3 rnd. (1 sc, inc)х6 times (18)
4 rnd. (2 sc, inc)х6 times (24)
5 rnd. 1 sc, (inc, 3 sc )х5 times, inc, 2 sc (30)
6 rnd. (4 sc, inc)х6 times (36)
7 rnd. (5 sc, inc)х6 times (42)
8 rnd. 3 sc, (inc, 6 sc )х5 times, inc, 3 sc (48)
9 rnd. (7 sc, inc)х6 times (54)
10 rnd. 4 sc, (inc, 8 sc )х5 times, inc, 4 sc (60)
11 rnd. Into the back loops only (9 sc, inc)х6 times (66)
12 rnd. 5 sc, (inc, 10 sc )х5 times, inc, 5 sc (72)
13 rnd. 3 sc, (inc, 11 sc )х5 times, inc, 6 sc, 2 sl st (78)
14 rnd. Into the back loops only 78 sc
15 rnd. 78 sc
16 rnd. 76 sc, 2 sl st (78)
Do not cut the thread!
.jpg)
Join both parts together. Add some hollow fibre, insert the cardboard bottom inside. Work 78 sc hooking through both parts. Add such an amount of hollow fibre that the part remains flat. Fasten off, cut off any excess yarn, hide the end.
.jpg)
.jpg)
Add some hollow fibre to the mushroom stem. Sew the mushroom to the stand to previously unworked front loops of the 11th round.
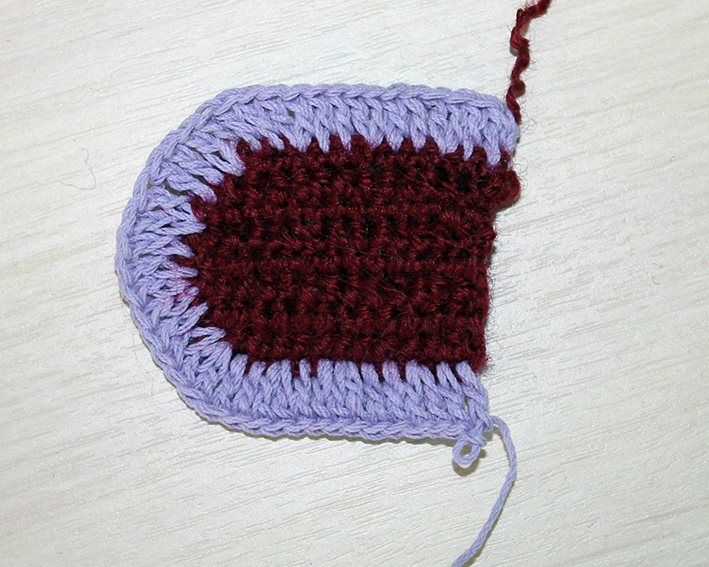
Door
Choose 2 matching colours (colours А and В). I chose colour A – burgundy, colour B – lilac.
Crochet in rows.
Start with colour A. Work 12 ch
1 row. starting from 2nd ch from hook: 10 hdc, 2 hdc in 1 loop, 1 ch, turn (12)
2 row. inc, 11 sc, 2 ch, turn (13)
3 row. 12 hdc, 2 hdc in 1 loop, 1 ch, turn (14)
4 row. 14 sc, 2 ch, turn (14)
5 row. 14 hdc, ch, turn (14)
6 row. dec, 12 sc, 2 ch, turn (13)
7 row. 11 hdc, 2 hdc together, 1 ch, turn (12)
8 row. dec, 10 sc, turn (11)
Change the yarn to colour B.
9 row. 2 ch, crochet from A to B: (2 dc, 2 dc in 1 loop)х 4 times, crochet from B to C: (2 dc, 2 dc in 1 loop)х 3 times, crochet from C to D: (2 dc, 2 dc in 1 loop)х 3 times, 3 dc (43)
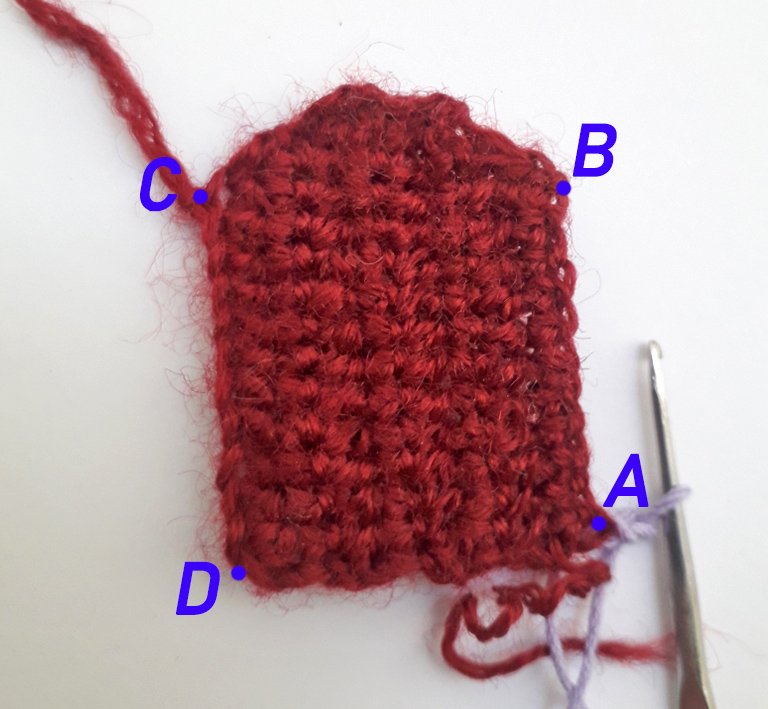
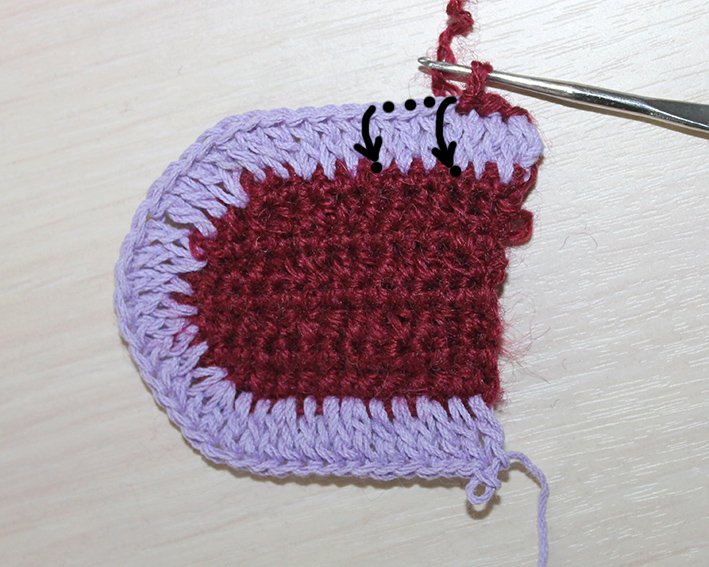
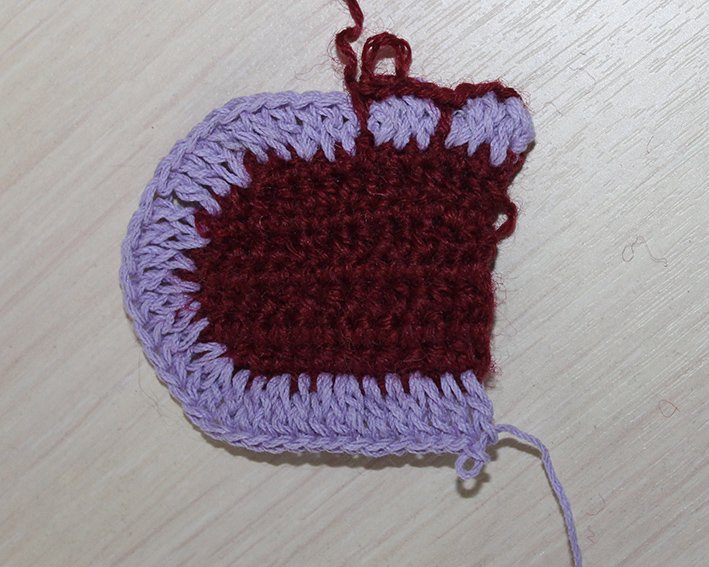
Fasten off, cut off any excess yarn. Return to the yarn of colour A at the beginning of the 9th row.
10 row with colour A: (3 sl st, 1 sc crochet into the base of the double crochet of the 9th row (hook through the row below, see the marked points on my photo))х 10 times, 3 sl st (43)
Fasten off, cut off.
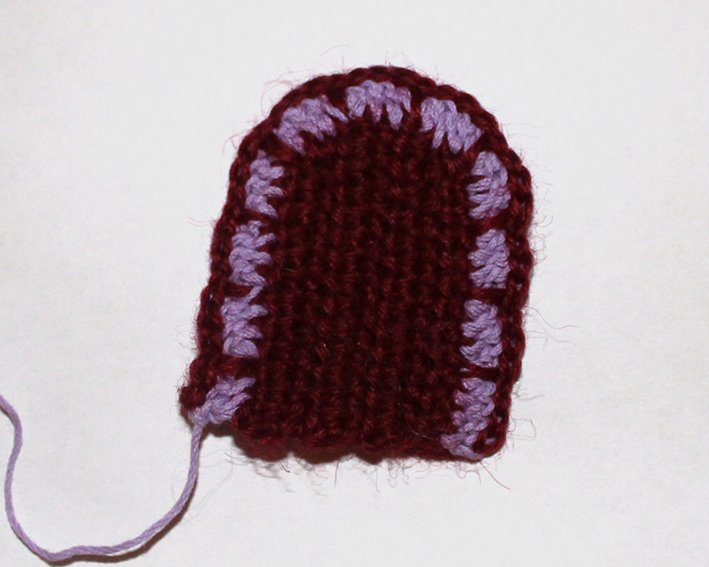
Door handle
Prepare a piece of wire which is approx. 1,0 mm thick and 4 cm long. Apply some transparent glue onto the middle of the wire and make neat wraps around it with yellow yarn. Leave 1 cm from each edge untreated. Insert the door handle into the door, bend the ends of the wire.
.jpg)
.jpg)
Windows
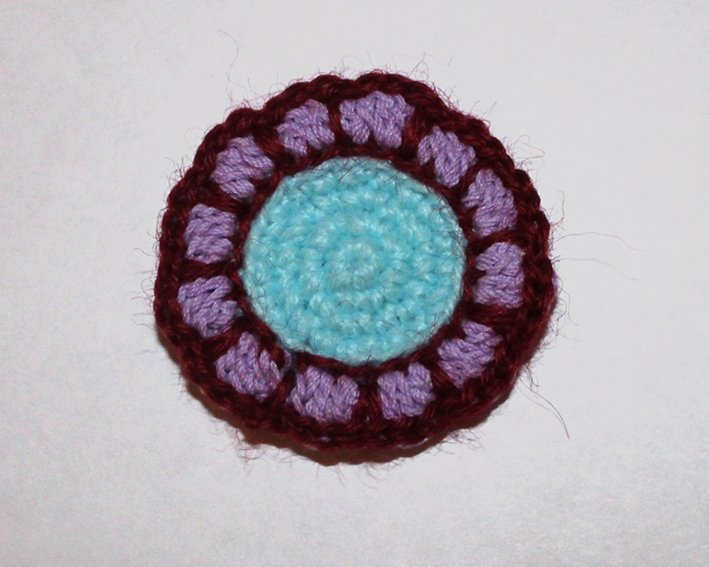
Start with light blue colour yarn.
1 rnd. 6 sc in a Magic Ring (6)
2 rnd. (inc)х6 times (12)
3 rnd. (1 sc, inc)х6 times (18)
4 rnd. (2 sc, inc)х6 times (24)
Work 1 sl st, transfer your place marker here. Change the yarn to colour А.
5 rnd. crochet loosely 24 sl st. Change the yarn to colour B.
6 rnd. Into the back loops only: 3 ch, 2 dc in 1 loop, join into a ring with a sl st (48)
Change the yarn to colour А.
7 rnd. (3 sl st, 1 sc crochet into the base of the double crochet of the 6th rnd)х 12 times (48)
Fasten off, cut off any excess yarn, hide the end.
Window frame
Crochet with the colour В.
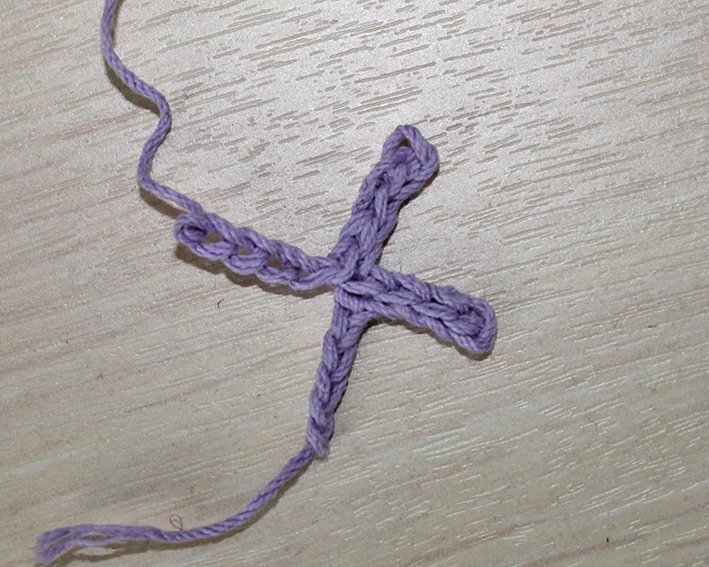
1 rnd. 9 ch, starting from 2nd ch from hook: 4 sl st, (5 ch, starting from 2nd ch from hook: 4 sl st)х 2 times, along the loops at the beginning of a chain 4 sl st. Fasten off, cut off.
Sew the ends of the frame to the window.
.jpg)
Chimney
This part is crocheted with chains used at the beginning of the round, they replace 1 double crochet. At the end of round, join in 1st and the last loops with the sl st.
Start with the colour A.
1 rnd. Work 20 ch with A colour yarn, join into a ring with a sl st. Crochet 1 more sl st. Change the yarn to colour B. (20)
2 rnd. 3 ch, 19 dc, join into a ring with a sl st. Change the yarn to colour А (20)
3 rnd. (3 sl st, 1 sc crochet into the base of the double crochet of the 2nd rnd)х 5 times (20)
Work 2 sl st. Change the yarn to colour B. Transfer your place marker here.
4 rnd. Into the back loops only: 3 ch, 19 dc, join into a ring with a sl st. Change the yarn to colour А (20)
.jpg)
5 rnd. (1 sc crochet into the base of the double crochet of the 4th rnd, 3 sl st)х 5 times (20)
Fasten off, cut off any excess yarn, hide the end.
.jpg)
.jpg)
Sew the chimney to the marked place of the mushroom cap. Make a tightening between points 1 and 2. See the photo for guidance. Make a short stitch and a knot.
.jpg)
Petals (make 3)
Use any coloured yarn.
1 rnd. work 4 ch, all crochet into the very 1st loop: (1 dc, 2 ch, 1 sl st, 2 ch)х4 times, 1 dc, 2 ch, 1 sl st – this will be a flower with 5 petals.
Fasten off, cut off.
.jpg)
Stamens (make 3)
Work with yellow colour yarn.
1 rnd. 6 sc in a Magic Ring, join into a ring with a sl st.
Fasten off, cut off any excess yarn, hide the end.
For the stems, take a thin wire, 3 segments of 10 cm long each. Insert the wire into the yellow part, hooking only the threads on the inside, the wire should not be visible on the front side. Fold the wire in half (the yellow part will remain in the middle of the wire), connect the ends and twist them together.
.jpg)
Sepal (make 3)
Work with green colour yarn. Before starting crocheting, leave a tail of yarn for further operation, about 10cm long.
1 rnd. 5 sc in a Magic Ring, join into a ring with a sl st.
Fasten off, cut off.
.jpg)
Connect the parts into flowers. Put the petals on the wire, then the sepal. Put a drop of glue on the sepal, press. Apply some transparent glue onto the wire and make neat wraps around it with green yarn, this will be a stem.
.jpg)
Grass
Work with green colour yarn. Work 42 ch.
1 row. starting from 2nd ch from hook: 41 sc, ch, turn (41)
2 row. 1 sl st, (6 ch, starting from 2nd ch from hook: 2 sl st, 3 sc, continue along the main stitches: 2 sl st) х 20 times
Fasten off, cut off any excess yarn, hide the end.
.jpg)
Butterfly, body
Work with thin brown colour yarn.
1 rnd. 6 sc in a Magic Ring (6)
2 rnd. (inc)х6 times (12)
3 rnd. 12 sc
4 rnd. ( dec) х 6 times (6) Add a small amount of hollow fibre.
5 rnd. 4 sc, dec (5)
6-10 rnd. 5 sc
Fasten off, cut off. Pull off the loops, hide the end.
.jpg)
Butterfly, big wings (make 2)
Choose 2 matching colours. I used colour C – yellow, colour D – orange. Start crocheting with colour C.
1 rnd. 6 sc in a Magic Ring (6)
2 rnd. (inc)х2 times, 3 hdc in 1 loop, (inc)х2 times, 3 hdc in 1 loop (14)
Work 1 sl st. Change the yarn to colour D.
3 rnd. (2 sc, inc, 1 sc, 3 hdc in 1 loop, 1 sc, inc) х 2 times (22)
Fasten off, cut off any excess yarn, hide the end.
Butterfly, small wings (make 2)
Start crocheting with colour C.
1 rnd. 6 sc in a Magic Ring, join into a ring with a sl st (6)
Change the yarn to colour D.
2 rnd. (2 hdc in 1 loop)х 4 times, 2 inc (12)
Fasten off, cut off any excess yarn, hide the end.
.jpg)
Mustache
Prepare a piece of thin 6 cm long wire. Apply some transparent glue onto the wire and make neat wraps around it with thin brown yarn.
Sew the wings on. Insert the mustache, fix it with a drop of glue. Twist the ends of the mustache.
.jpg)
Glue the window. Glue the door to the opposite side from the window.
.jpg)
Insert the flower stems into the lower part of the mushroom, you can fix them with a drop of glue. Glue the grass from one end of the door to the other.
.jpg)
Attach the butterfly to the mushroom cap.
The fairy - tale mushroom house is completed!

