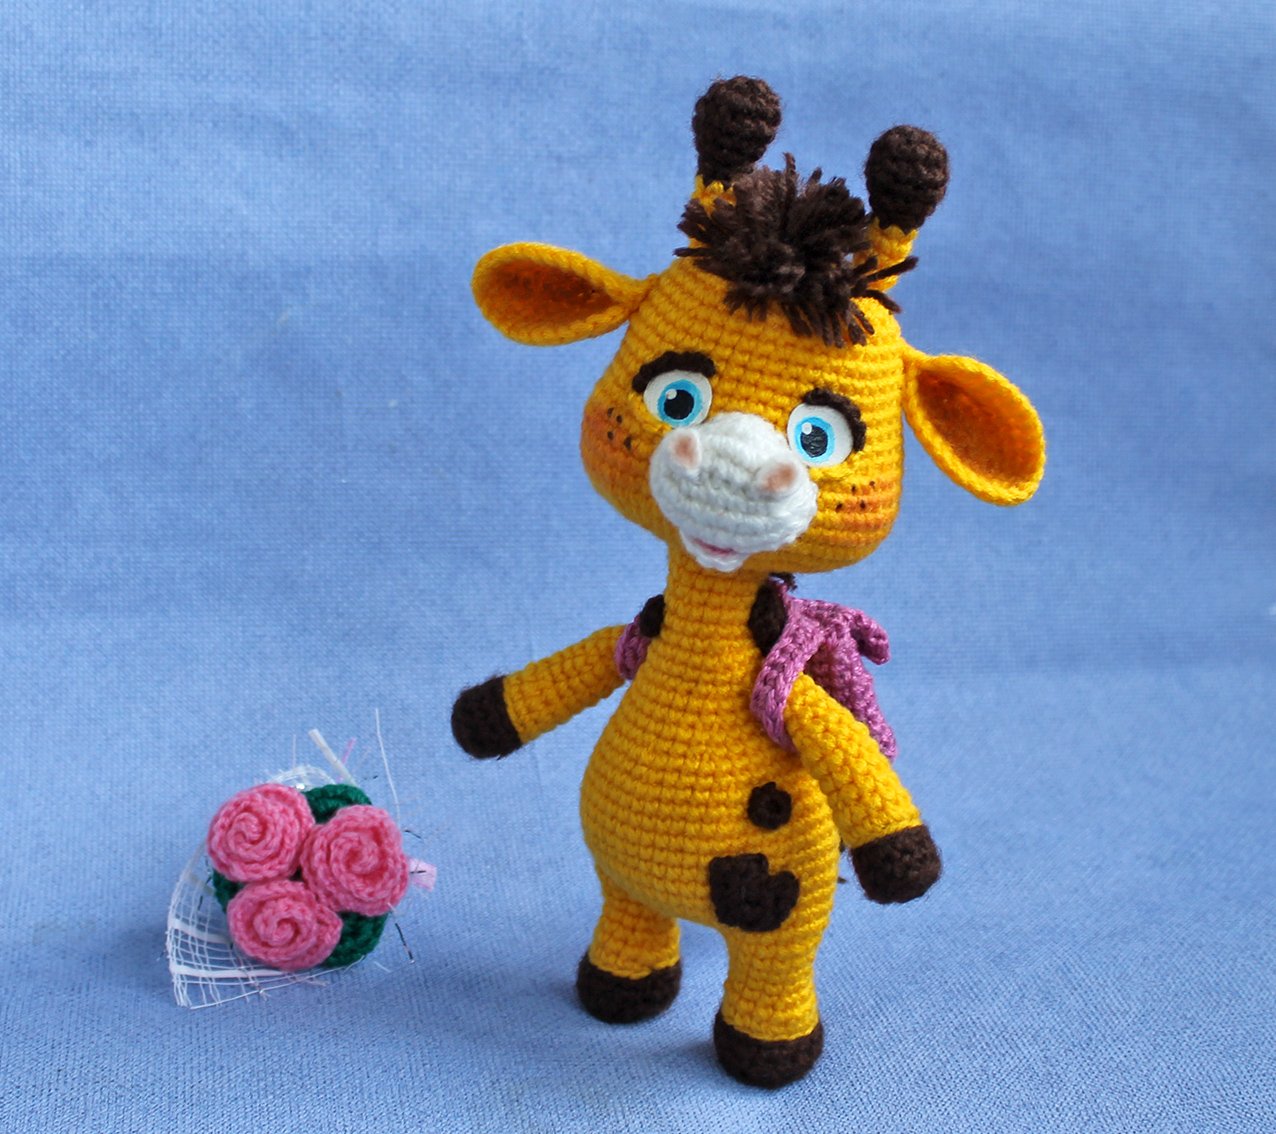
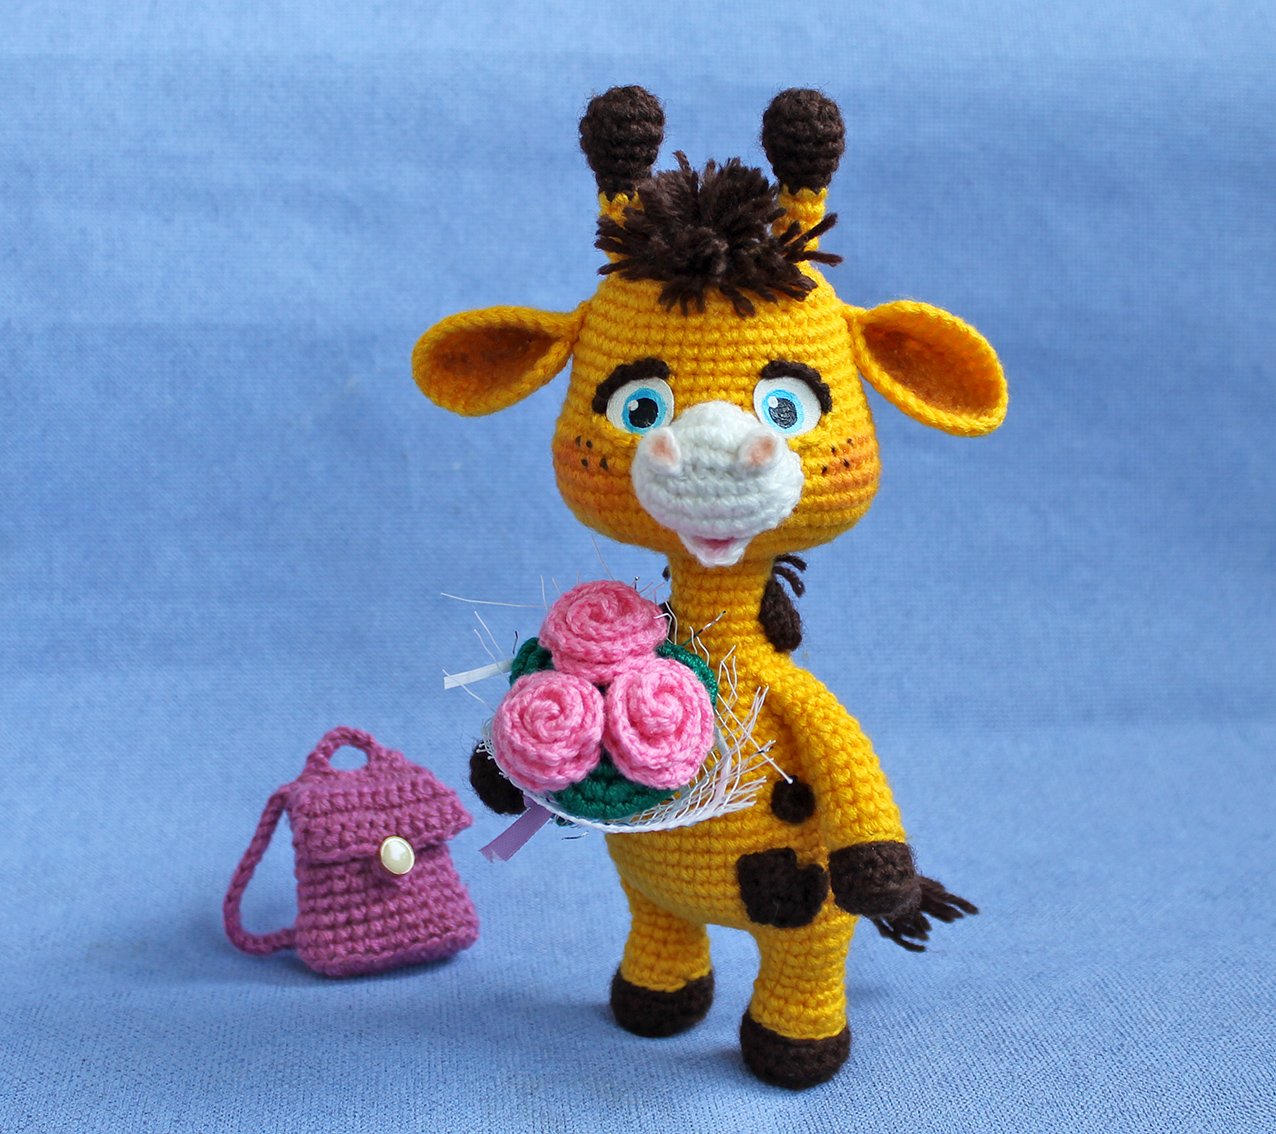
Giraffe schoolboy
Materials:
Yarn of your choice. Acrylic, wool, velour or cotton will do. I used acrylic yarn, 200 m/100 g. The size of my giraffe is 20 cm. Depending on the thickness of yarn a finished toy size may differ.
Required yarn colors: yellow, brown, white, green, pink or red. Any yarn color is suitable for a backpack.
- A crochet hook, I used 2,0 mm crochet hook
- A sewing needle, matching sewing threads
- Hollow fibre for stuffing
- Transparent glue (at your wish)
- 1 pair of ready-made eyes. I painted the eyes with acrylic paints
- Suitable means for tinting (at your wish)
- 1 small button
Abbreviations:
ch – chain
sl st – slip stitch
sc – single crochet
hdc – half double crochet
dc - double crochet
inc – increase (2 sc in 1 st)
2 inc, 3 inc – 2, 3 increases in sequence
dec – decrease (single crochet two stitches together)
2 dec, 3 dec – 2, 3 decrease in sequence
(...) x N times – repeat instructions in brackets N times
Arms (make 2)
Start with brown colour yarn.
Rnd 1. 6 sc in a Magic Ring
Rnd 2. inc х 6 times = 12
Work 1 sl st, transfer your place marker here
Rnd 3. into the back loops only: 12 sc
Rnd 4. 11 sc, 1 sl st = 12
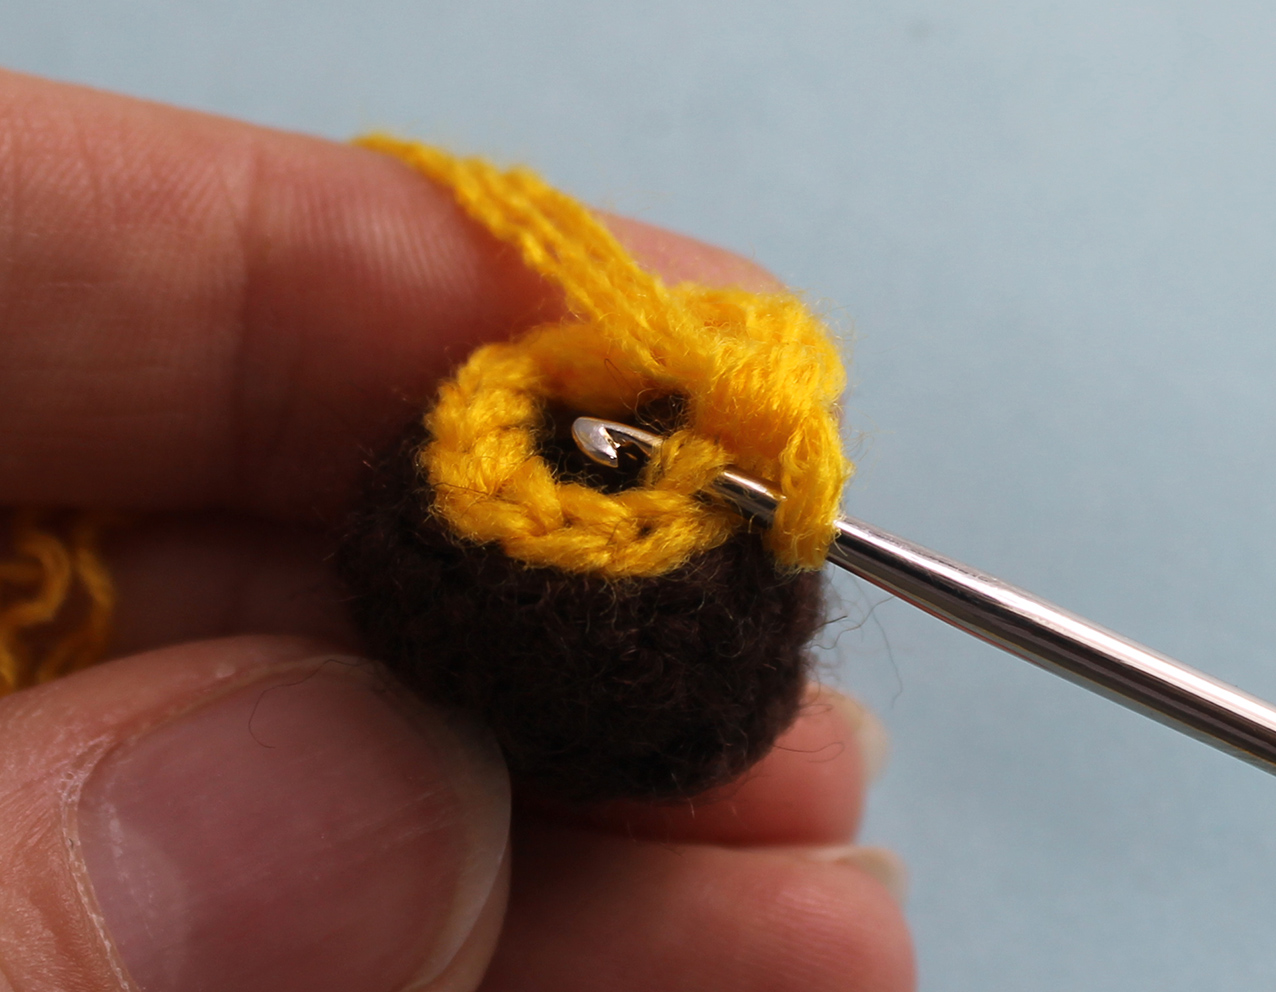
Change to yellow yarn. Fasten and cut off the brown colour yarn.
Rnd 5. into the back loops only: 12 sl st
Rnd 6. into the back loops only: 12 sc
Rnd 7. 12 sc
Rnd 8. (dec, 4 sc)х 2 times = 10
Rnd 9-11. (3 rounds) 10 sc
Add some hollow fibre. Insert the wire into the arms (at your wish).
Rnd 12. (dec, 3 sc)х 2 times = 8
Work 2 sc, transfer your place marker here
Rnd 13-15. (3 rounds) 8 sc
Rnd 16. Fold the part in two, work 3 sc by hooking through both edges of the part: (leave 2 loops at the beginning and end of the curve unworked) = 3
Fasten off, cut off any excess yarn.
Legs (make 2)
Start with brown colour yarn.
Rnd 1. 7 sc in a Magic Ring
Rnd 2. inc х 7 times = 14
Work 1 sl st, transfer your place marker here
Rnd 3. into the back loops only: 14 sc
Rnd 4. 13 sc, 1 sl st = 14
Change to yellow yarn. Fasten and cut off the brown colour yarn.
Rnd 5. into the back loops only: 14 sl st
Rnd 6. into the back loops only: 14 sc
Rnd 7. 14 sc
Rnd 8. (dec, 5 sc)х 2 times = 12
Rnd 9-10. (2 rounds) 12 sc
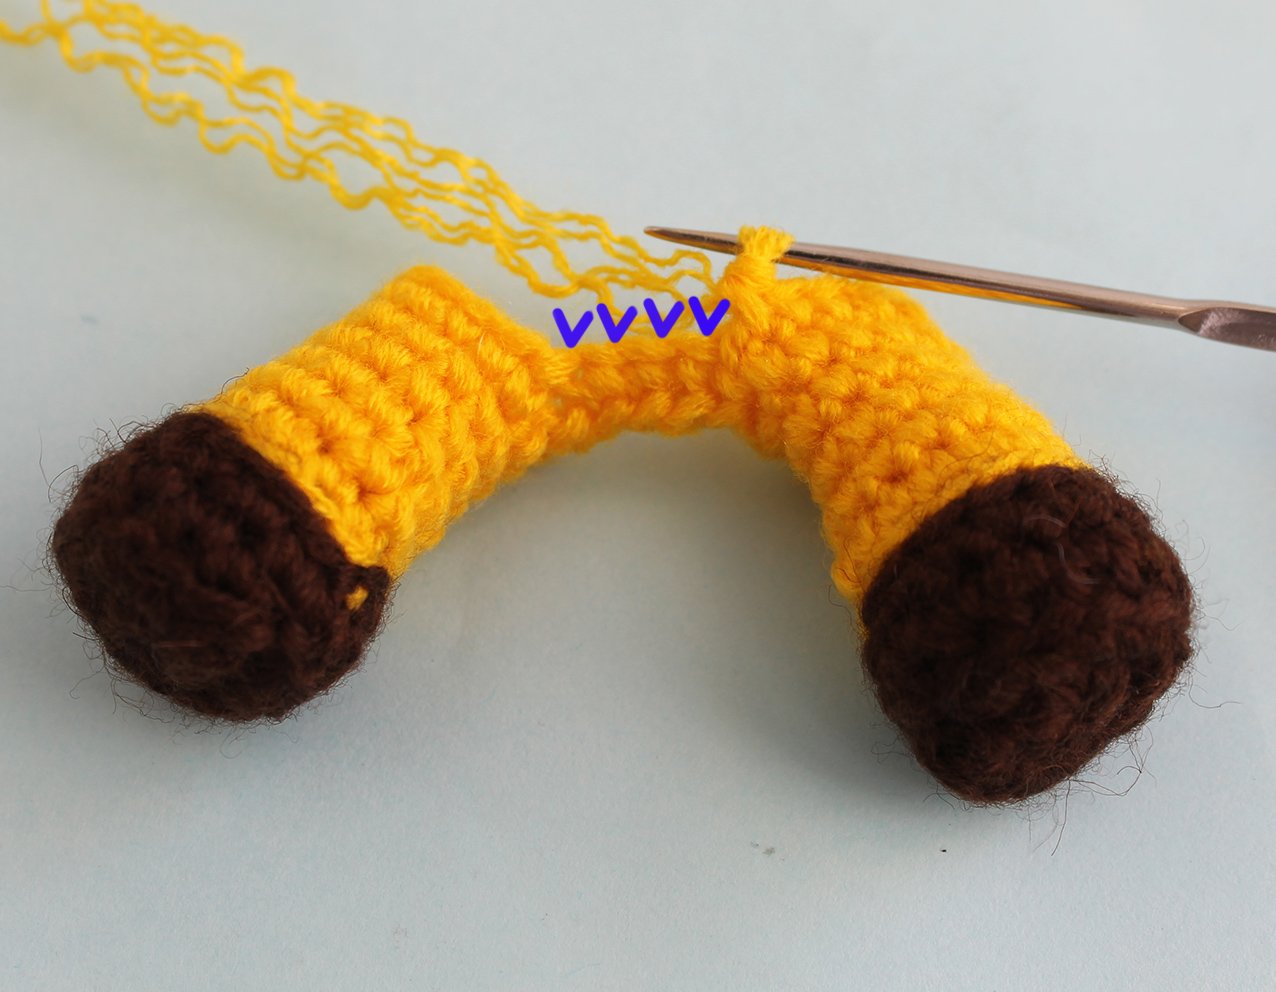
Fasten and cut off thread of Part 1, do not cut thread of Part 2.
Next, we crochet the body.
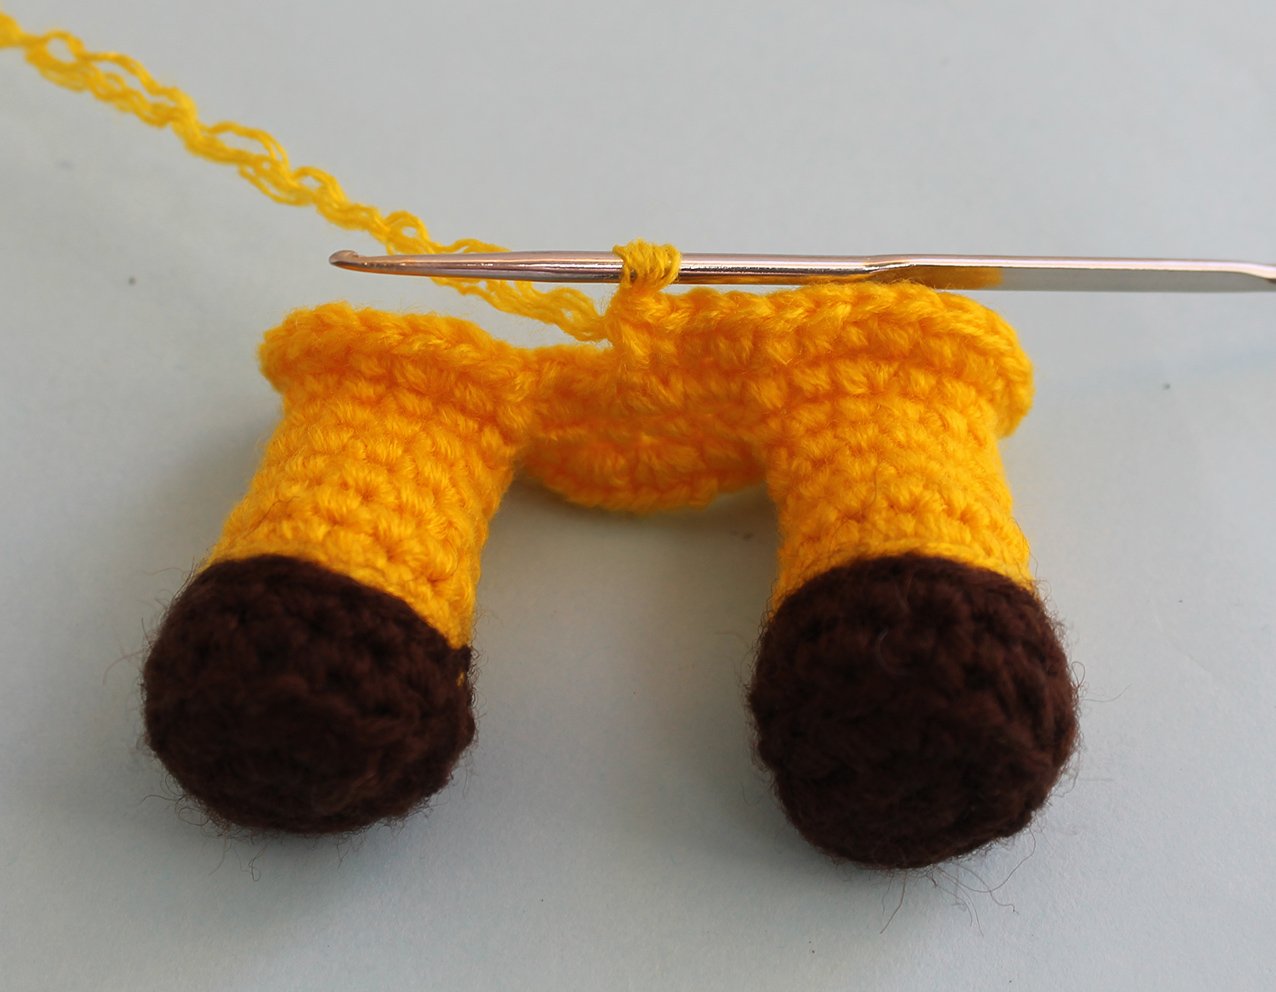
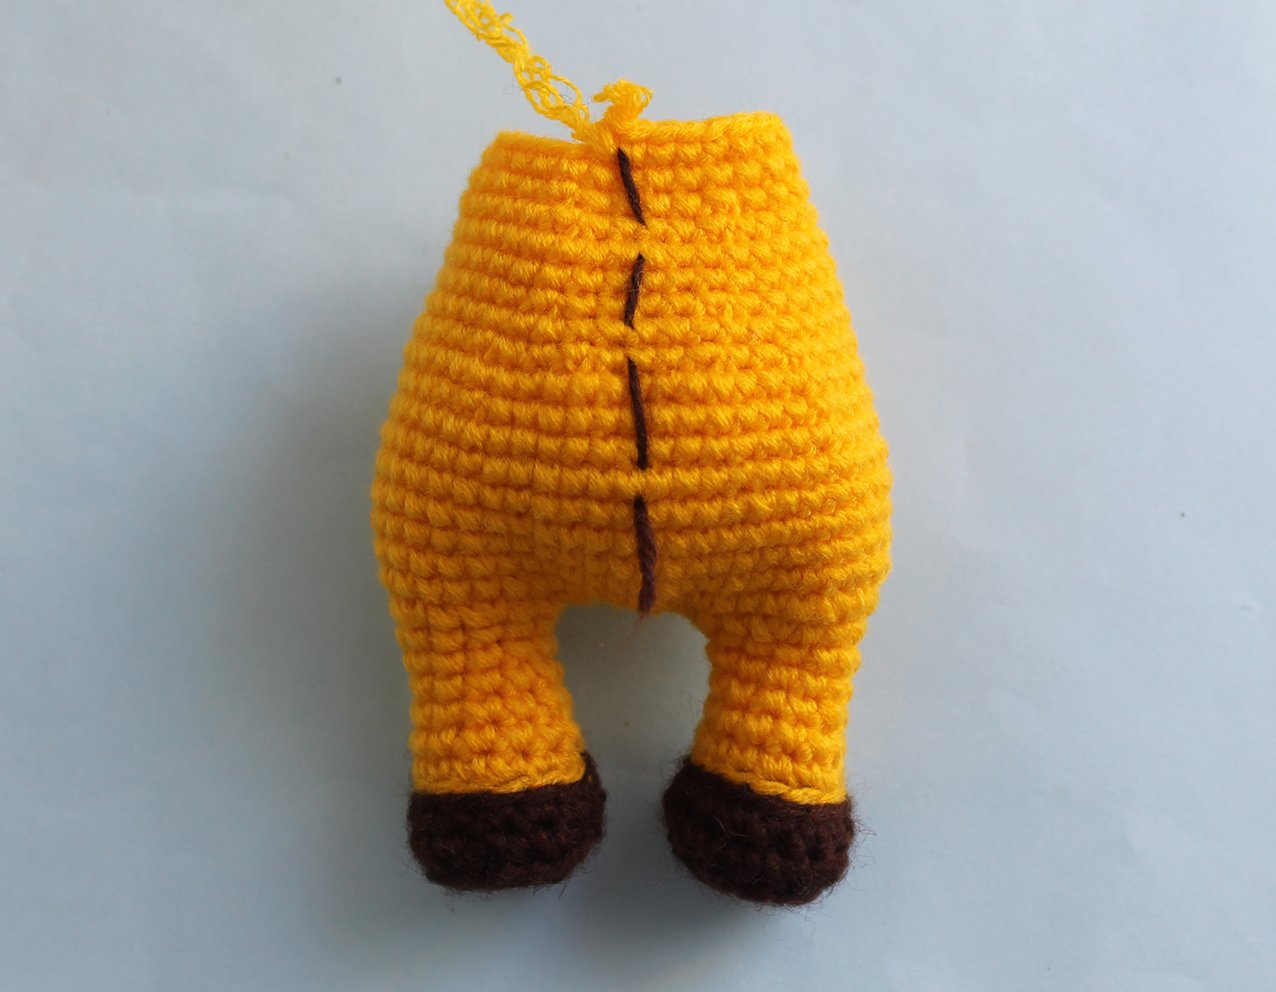
OBS: the legs are connected with 4 ch. Every ch has 2 half loops (front and back). In Rnd 11 you will need to work in front loops and in Rnd 12 in back loops. There must not be any hole between the legs. See photos for guidance.
Rnd 11. Work 4 ch, work 12 sc into the loops of the 1st leg, continue along the chain: 4 sc, continue along the loops of the 2nd leg: 9 sc, inc, 2 sc = 29
Rnd 12. along the other side of the chain: 4 inc, along the main loops: 2 sc, (inc, 1 sc)х 2 times, inc, 4 sc, inc, 1 sc, (3 sc in 1 loop)х 2 times, 1 sc, inc, 4 sc, (inc, 1 sc)х 2 times, 4 sc = 48
Work 4 sc, transfer your place marker here. Align your marker so it is in the centre of the back. Adjust as and when to keep it straight. Keep an eye on the symmetry!
Add some hollow fibre into the legs
Rnd 13. 20 sc, inc, 6 sc, inc, 20 sc = 50
Rnd 14-18. (5 rounds) 50 sc
Rnd 19. 42 sc, dec, 6 sc = 49
Rnd 20. 6 sc, dec, 41 sc = 48
Rnd 21. 41 sc, dec, 2 sc, dec, 1 sc = 46
Work 1 sc, transfer your place marker here.
Rnd 22. 1 sc, dec, 2 sc, dec, 10 sc, dec, 11 sc, dec, 14 sc = 42
Rnd 23. 38 sc, dec, 2 sc = 41
Rnd 24. 2 sc, dec, 10 sc, dec, (4 sc, dec)х 2 times, 13 sc = 37
Rnd 25. 37 sc
Rnd 26. 14 sc, (dec, 2 sc)х 2 times, dec, 9 sc, dec, 2 sc = 33
Rnd 27. 2 sc, dec, 25 sc, dec, 2 sc = 31
Rnd 28. 2 sc, dec, 8 sc, dec, 6 sc, dec, 9 sc = 28
Rnd 29. 28 sc
Work 1 sc, transfer your place marker here.
Join arms to the body in the next round, keep an eye on the symmetry of the toy!
Rnd 30. 5 sc, attach the 1st arm, work the loops of the arm and body together: 3 sc, work into the loops of the body: 2 sc, dec, 4 sc, dec, 2 sc,
attach the 2nd arm, work the loops of the arm and body together: 3 sc, work into the loops of the body: 5 sc = 26
Rnd 31. 2 sc, dec, 18 sc, dec, 2 sc = 24
Add some hollow fibre.
Rnd 32. 24 sc
Rnd 33. (2 sc, dec, 2 sc)х 4 times = 20
Rnd 34-35. (2 rounds) 20 sc
Rnd 36. (dec, 3 sc)х 4 times = 16
Rnd 37-39. (3 rounds) 16 sc
Add some hollow fibre.
If you want your giraffe's neck to be longer than this giraffe's, crochet a few more rounds.
Do not cut the thread! Next, we crochet the head.
Rnd 40. into the front loops only: inc х 16 times (32)
Rnd 41. 1 sc, (inc, 2 sc)х 2 times, inc, 3 sc in 1 loop, inc, 2 sc, (inc, 1 sc)х 2 times, (1 sc, inc)х 2 times, 2 sc, inc, 3 sc in 1 loop, inc, (2 sc, inc)х 2 times, 1 sc = 48
Work 1 sc, transfer your place marker here.
Rnd 42. 12 sc, 3 inc, 1 sc, 3 inc, 10 sc, 3 inc, 1 sc, 3 inc, 12 sc = 60
Rnd 43-48. (6 rounds) 60 sc
Rnd 49. 16 sc, 4 dec, 1 sc, dec, 6 sc, dec, 1 sc, 4 dec, 10 sc, dec, 4 sc = 49
Rnd 50. 4 sc, dec, 43 sc = 48
Rnd 51-52. (2 rounds) 48 sc
Rnd 53. (5 sc, dec, 5 sc)х 4 times = 44
Rnd 54-55. (2 rounds) 44 sc
Work 1 sc, transfer your place marker here.
Rnd 56. 4 sc, (dec, 9 sc)х 3 times, dec, 5 sc = 40
Rnd 57-58. (2 rounds) 40 sc
Rnd 59. (3 sc, dec, 3 sc)х 5 times = 35
Rnd 60. (dec, 3 sc)х 7 times = 28
Rnd 61. (1 sc, dec, 1 sc)х 7 times = 21
Add some hollow fibre. Fill cheeks well.
Rnd 62. (dec, 1 sc)х 7 times = 14
Rnd 63. 7 dec = 7
Fasten off, cut the thread, leaving long tail for further operation.
Do not close off the loops of the last round just yet, you will do it later!
Muzzle
Work with white colour yarn (or brown colour yarn – as you wish).
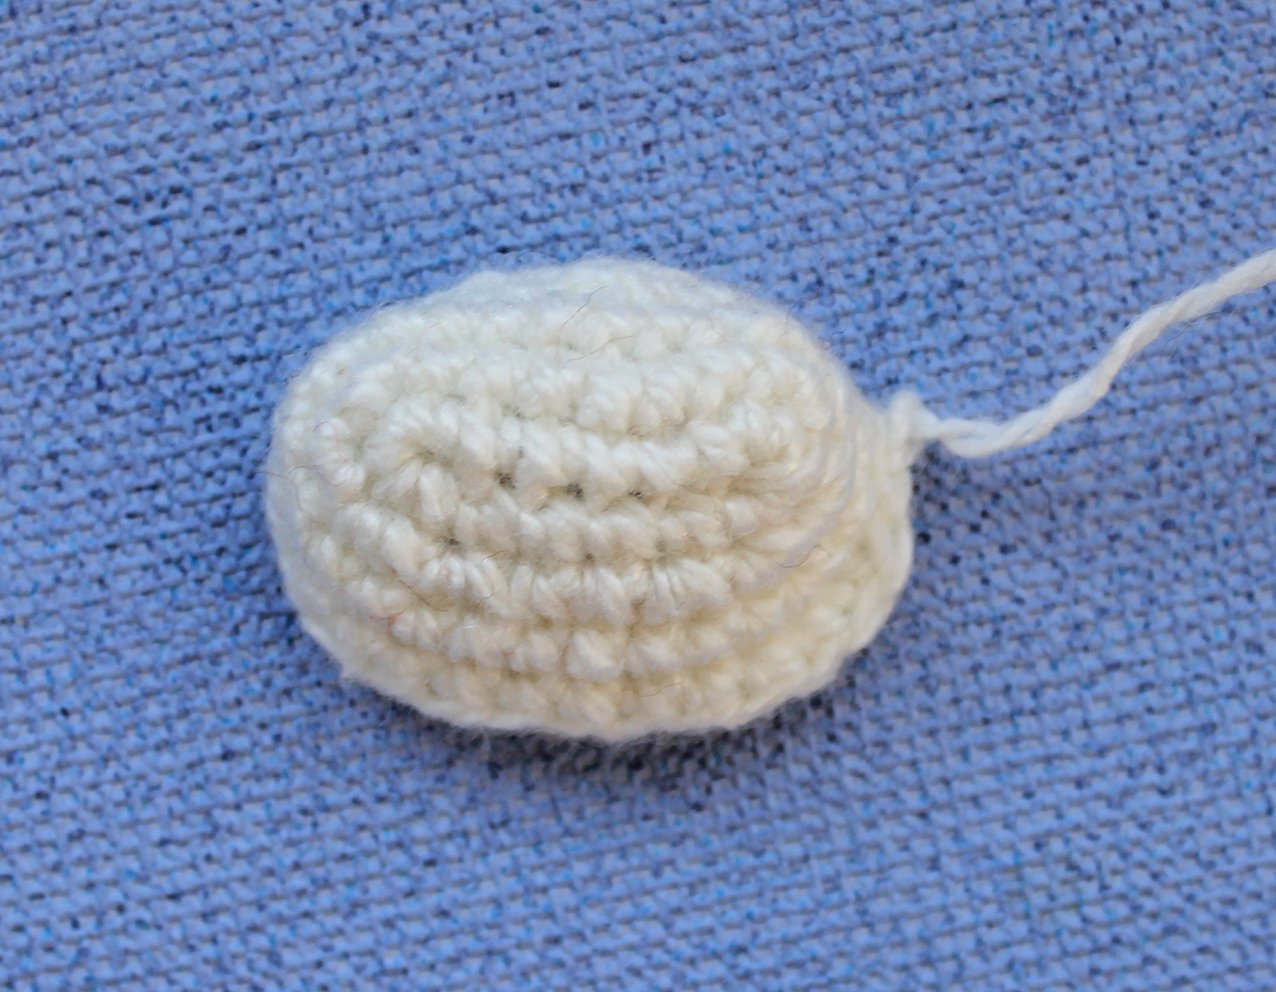
Work 7 ch
Rnd 1. starting from 2nd ch from hook: inc, 4 sc, 4 sc in the last stitch, continue along the other side of chain: 4 sc, inc = 16
Rnd 2. inc, 6 sc, inc х 4 times, 2 sc, inc х 3 times = 24
Rnd 3. 12 sc, inc, 8 sc, inc, 2 sc = 26
Rnd 4. 4 sc, dec, 18 sc, 2 sl st = 25
Fasten off, cut the thread, leaving long tail for sewing.
Lower lip
Work with white colour yarn (or brown colour yarn).
1 Rnd. Work 4 ch, starting from 2nd ch from hook: 1 sl st, 1 inc, 1 sl st = 4
Fasten off, cut the thread, leaving long tail for sewing.
Nostrils (make 2)
Work with white colour yarn (or brown colour yarn).
1 Rnd. Work 5 ch, join into a ring with a sl st.
Fasten off, cut off any excess yarn.
Ear (make 2)
Work with yellow colour yarn.
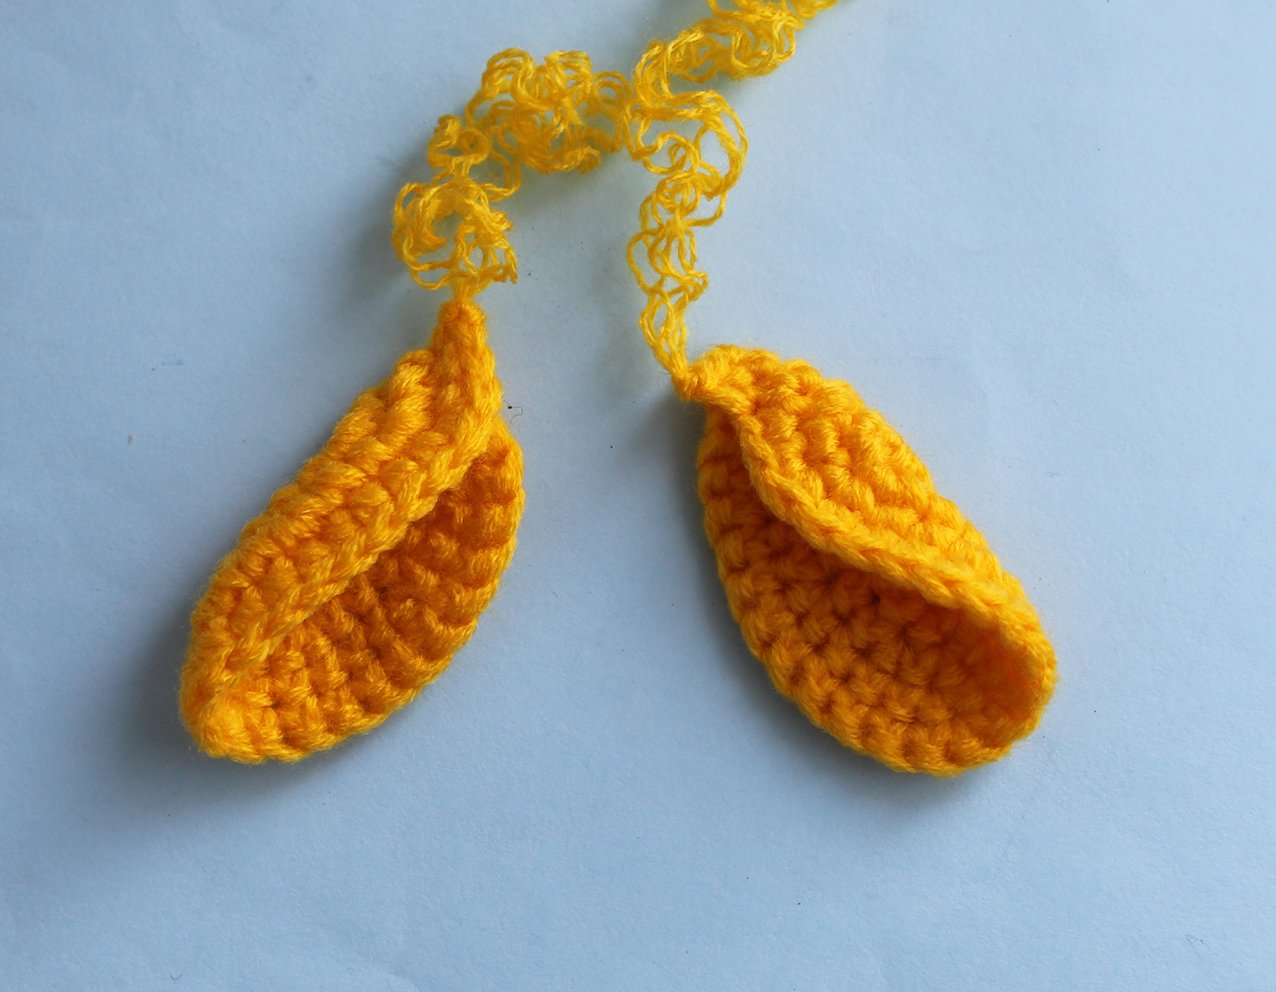
Work 6 ch
Rnd 1. starting from 2nd ch from hook: inc, 3 sc, 3 sc in the last stitch, continue along the other side of chain: 3 sc, inc = 13
Rnd 2. 2 inc, 3 sc, inc х 3 times, 3 sc, inc х 2 times = 20
Rnd 3. (2 sc, inc)х 2 times, 4 sc, inc, 3 sc, (inc, 2 sc)х 2 times = 25
Rnd 4. For the right ear: 2 sc, inc, 9 sc, 3 sc in 1 loop, 9 sc, inc, fold the part in two, work 2 sc by hooking through both edges of the part = 29
Rnd 4. For the left ear: 2 sc, inc, 9 sc, 3 sc in 1 loop, 9 sc, inc, 2 sc, fold the part in two, work 2 sc by hooking through both edges of the part = 29
Fasten off, cut the thread, leaving long tail for sewing.
Horns (make 2)
Crochet with brown colour yarn
Rnd 1. 6 sc in a Magic Ring
Rnd 2. 6 inc = 12
Rnd 3-4. (2 rounds) 12 sc
Rnd 5. (dec, 2 sc)х 3 times = 9
Rnd 6. (dec, 1 sc)х 3 times = 6
Add some hollow fibre.
Change to yellow yarn. Fasten and cut off the brown colour yarn.
Rnd 7-10. (4 rounds) 6 sc
Fasten off, cut the thread, leaving long tail for sewing.
Tail
Work with yellow colour yarn.
Work 9 ch, starting from 2nd ch from hook: 8 sl st.
Fasten off, cut the thread, leaving long tail for further operation.
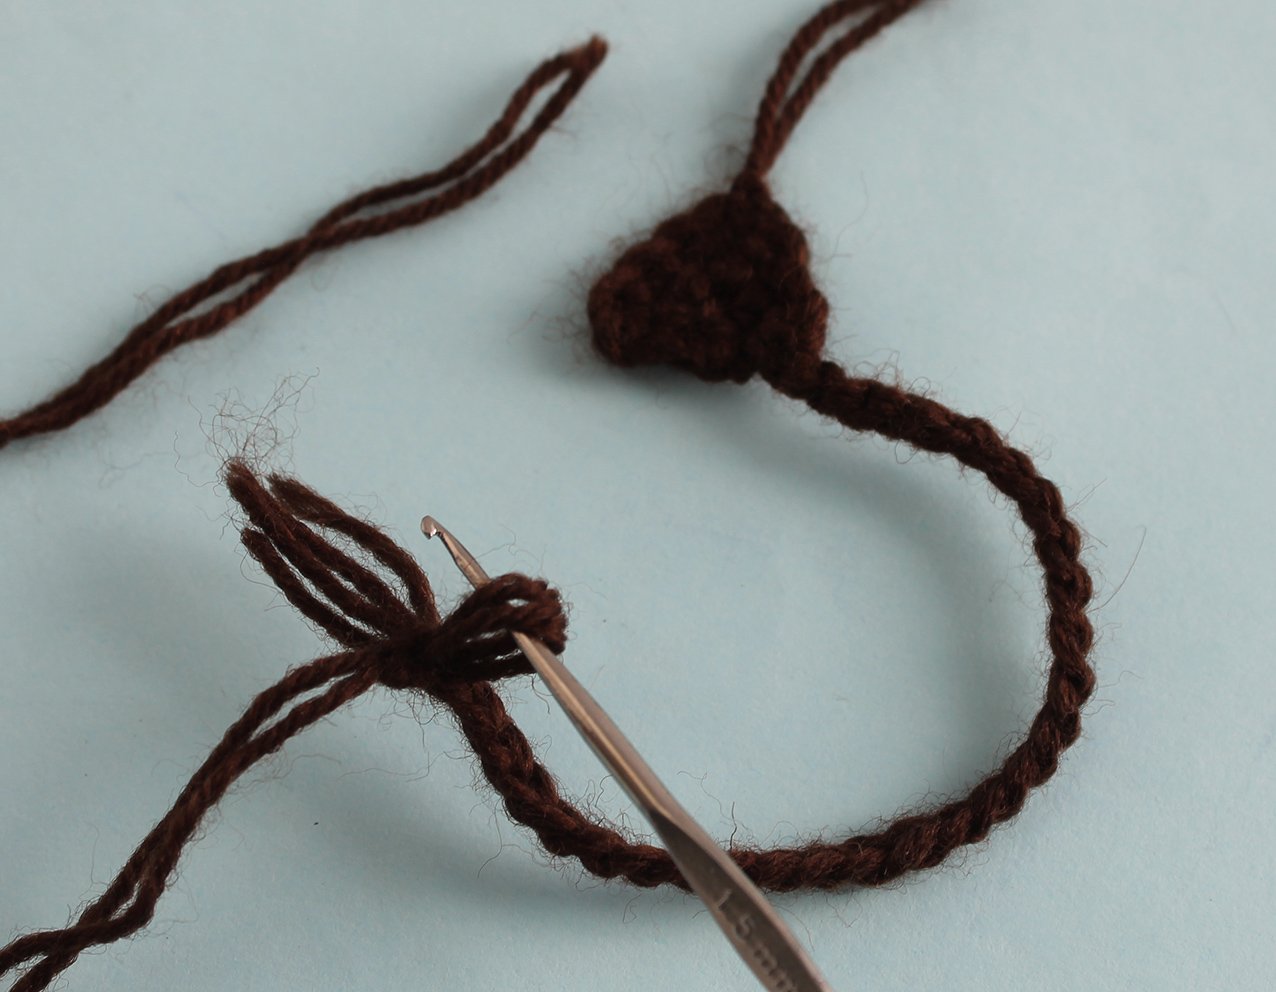
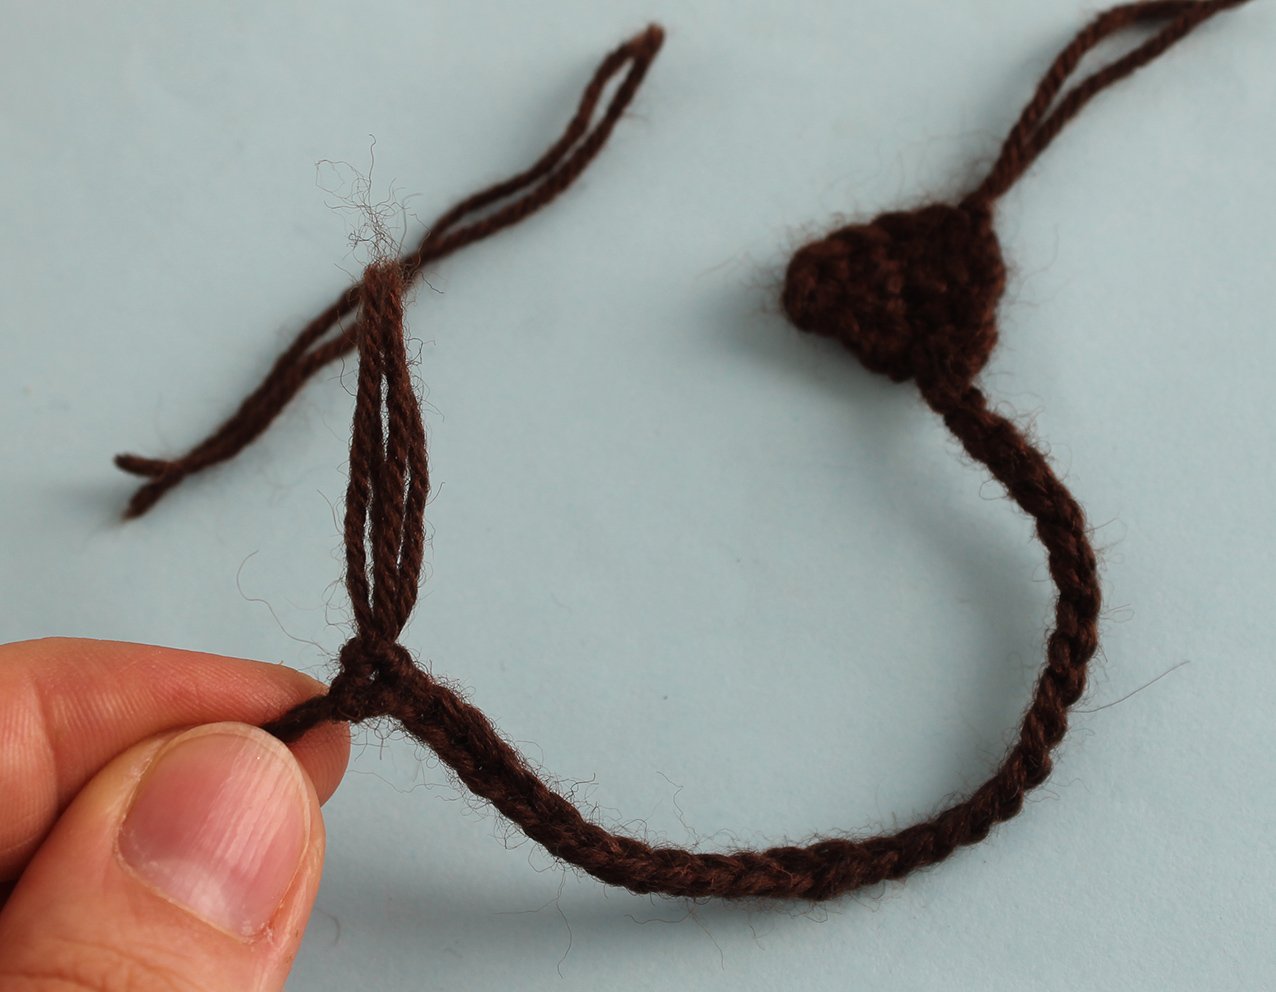
Take brown colour yarn, cut it into 8 cm long segments. Tie 2 knots in the middle with the tips of the tail (See photos for guidance). Then fold in half and tie again with brown yarn, forming a tassel on the tail. Brush the tail to make it fluffy and trim it.
Mane
Crochet with brown colour yarn
Work 6 ch
Rnd 1. starting from 2nd ch from hook: 5 sc, 1 ch, turn = 5
Rnd 2. skip 1 loop, 2 sc, skip 1 loop, 1 sc, 1 ch, turn = 3
Rnd 3. skip 1 loop, 2 sc, 1 ch, turn = 2
Rnd 4. skip 1 loop, 1 sc, work 30 ch
Fasten off, cut off any excess yarn.
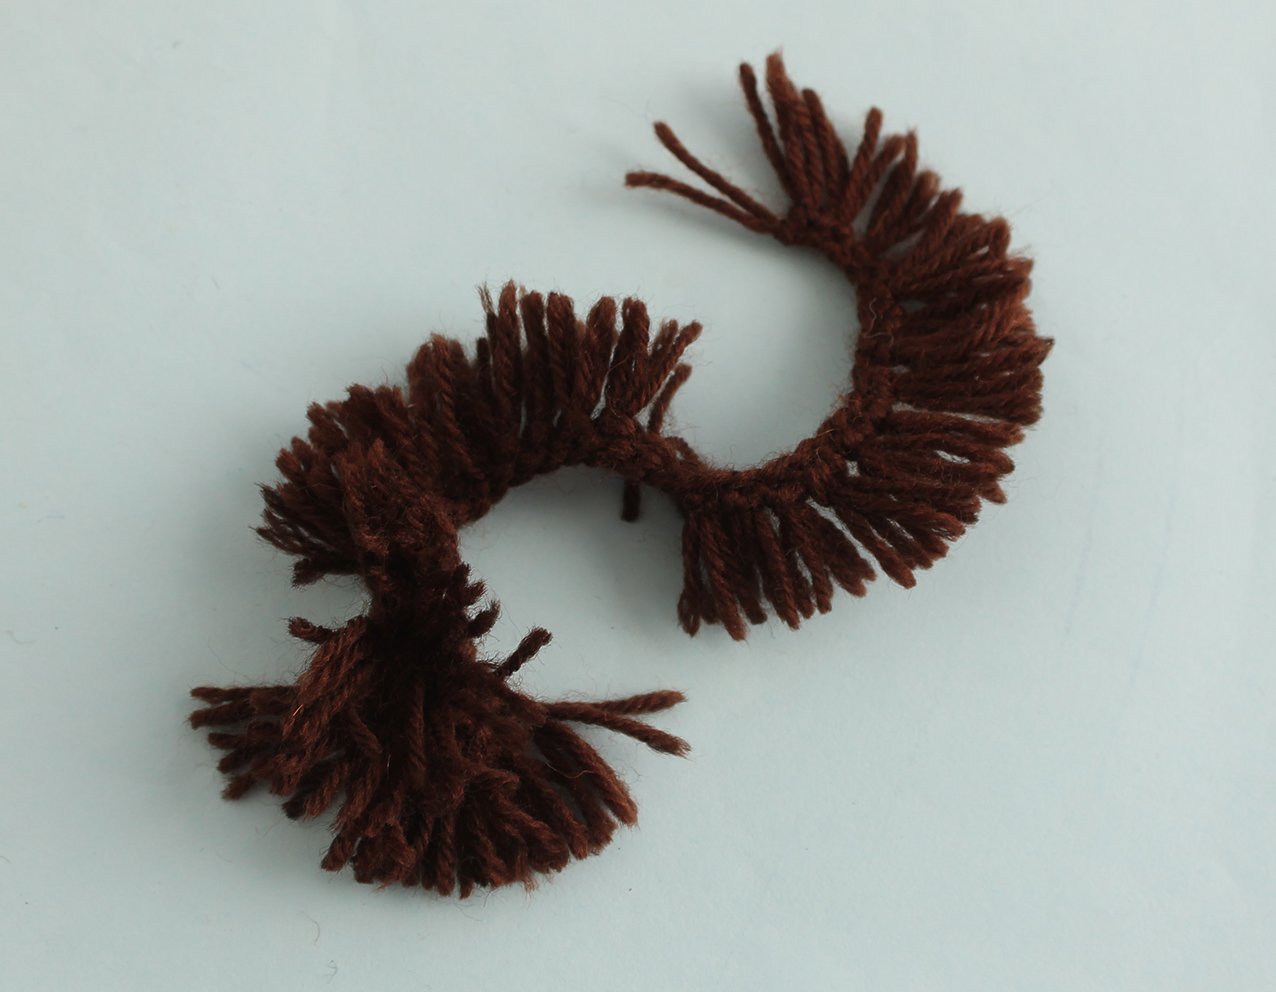
Take brown colour yarn, cut it into 7-8 cm long segments. Attach hairs to each loop. See photos for guidance. Trim the mane.
Giraffe Spots (make 6-7)
Crochet with brown colour yarn
Work 5 ch
Rnd 1. starting from 2nd ch from hook: 4 sc, 1 ch, turn = 4
Rnd 2. skip 1 loop, 3 sc, 1 ch, turn = 3
Rnd 3. 2 sc, 1 ch, turn = 2
Rnd 4. skip 1 loop, 1 sc = 1
Fasten off, cut the thread, leaving long tail for sewing.
Assembly and Decoration
Attach the muzzle to the head, make sure its upper part is in line with Rnd 50.
Sew it on with hidden stitches and stuff a little as you go.
Attach the ears and horns to the head. Sew them on.
Attach the nostrils and lower lip. Sew them on.
Slightly tighten the bridge of the nose between spots А and В. (See the photo for guidance)
Choose the right eyes. You can choose ready-made eyes, make them out of polymer clay, paint with paints, crochet or embroider with yarn. I painted the eyes on the fabric with acrylic paints. Stages of drawing on my photos.
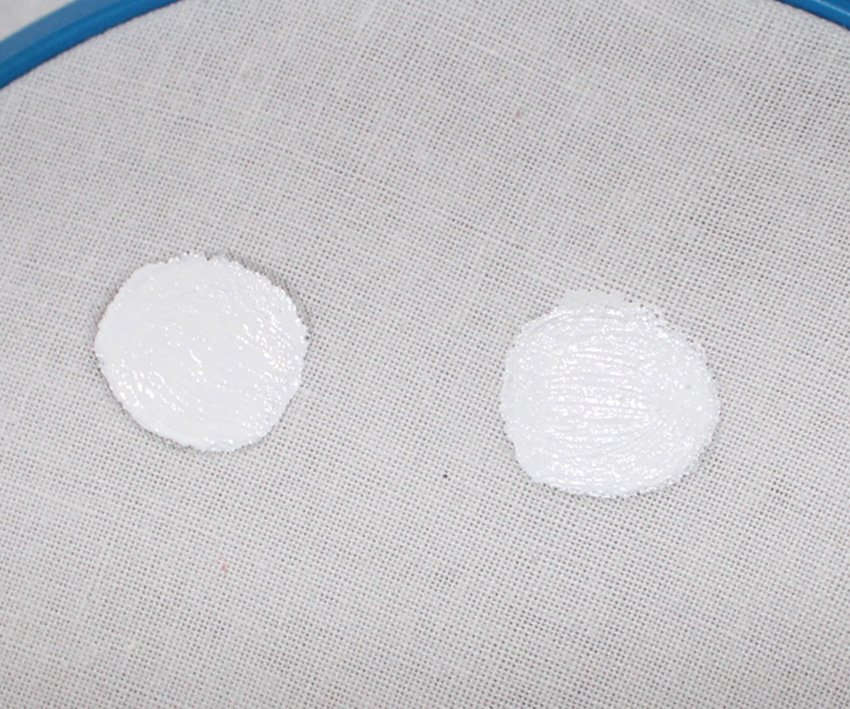
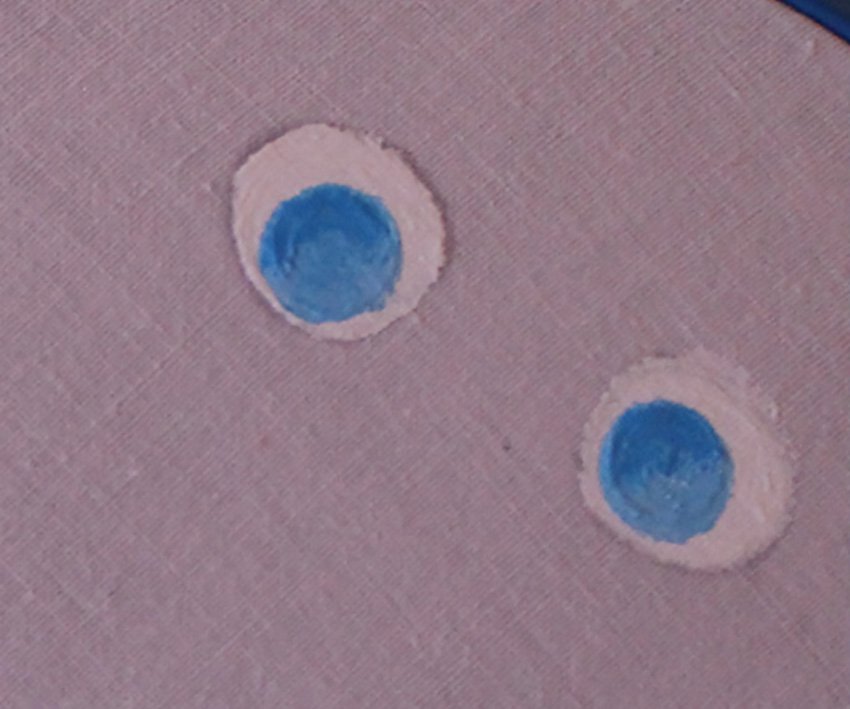
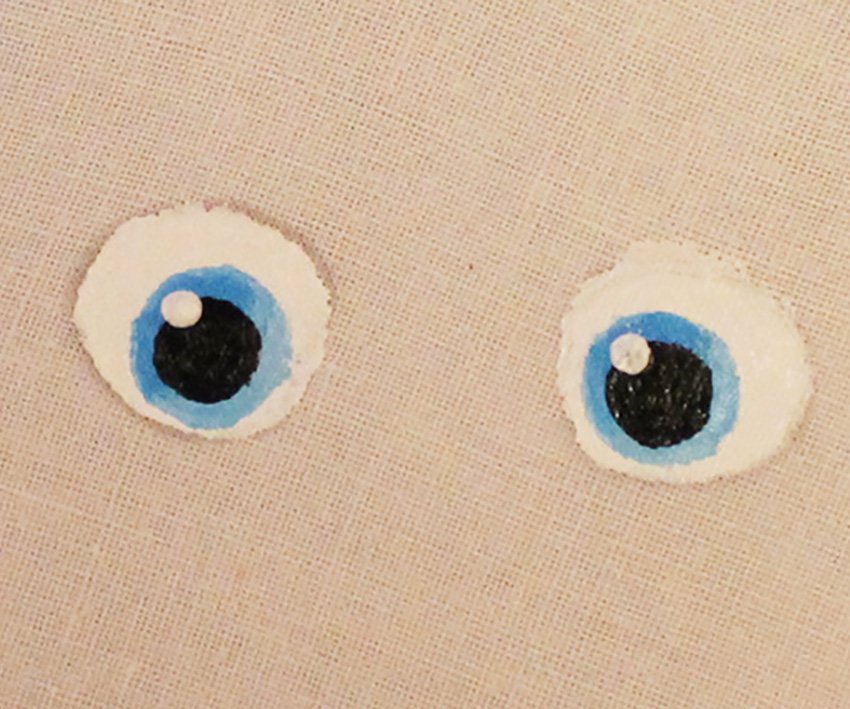
Glue the eyes. Sew on the upper and lower eyelids – optional.
Upper eyelids (make 2)
Crochet with brown colour yarn
Work 6 ch. Fasten off, cut the thread, leaving long tail for sewing.
Lower eyelids (make 2)
Work with yellow colour yarn.
Work 4 ch. Fasten off, cut the thread, leaving long tail for sewing.
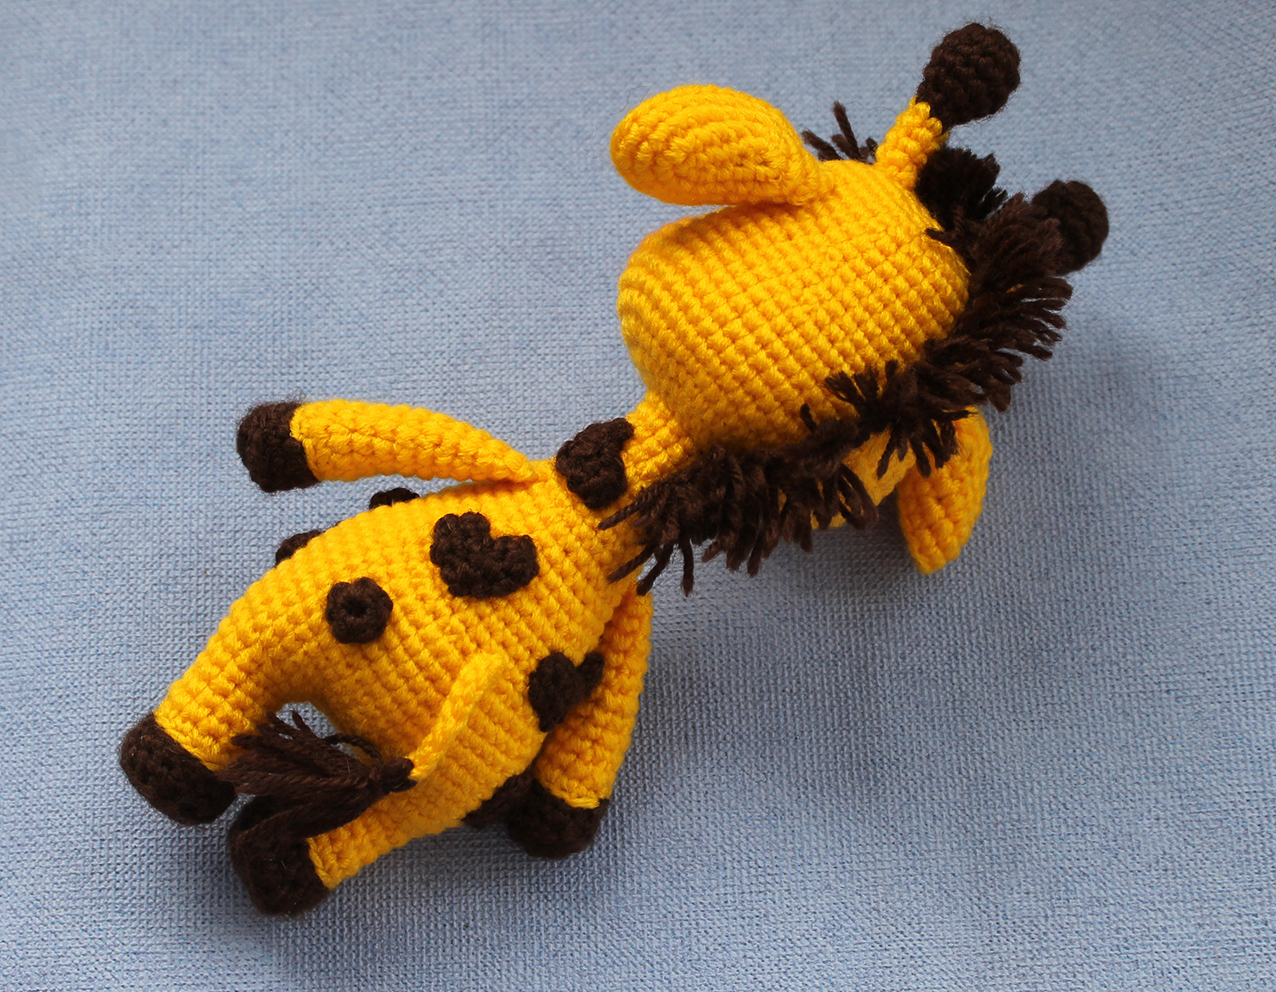
Sew the mane to the head and neck. Sew the tail to the body. Sew the spots on the sides and to the back.
Optional: Tint the nostrils and the inside of the ears with brown dry soft pastels, tint the inside of the lower lip with pink dry soft pastels. Draw freckles with a marker pen.
School bag
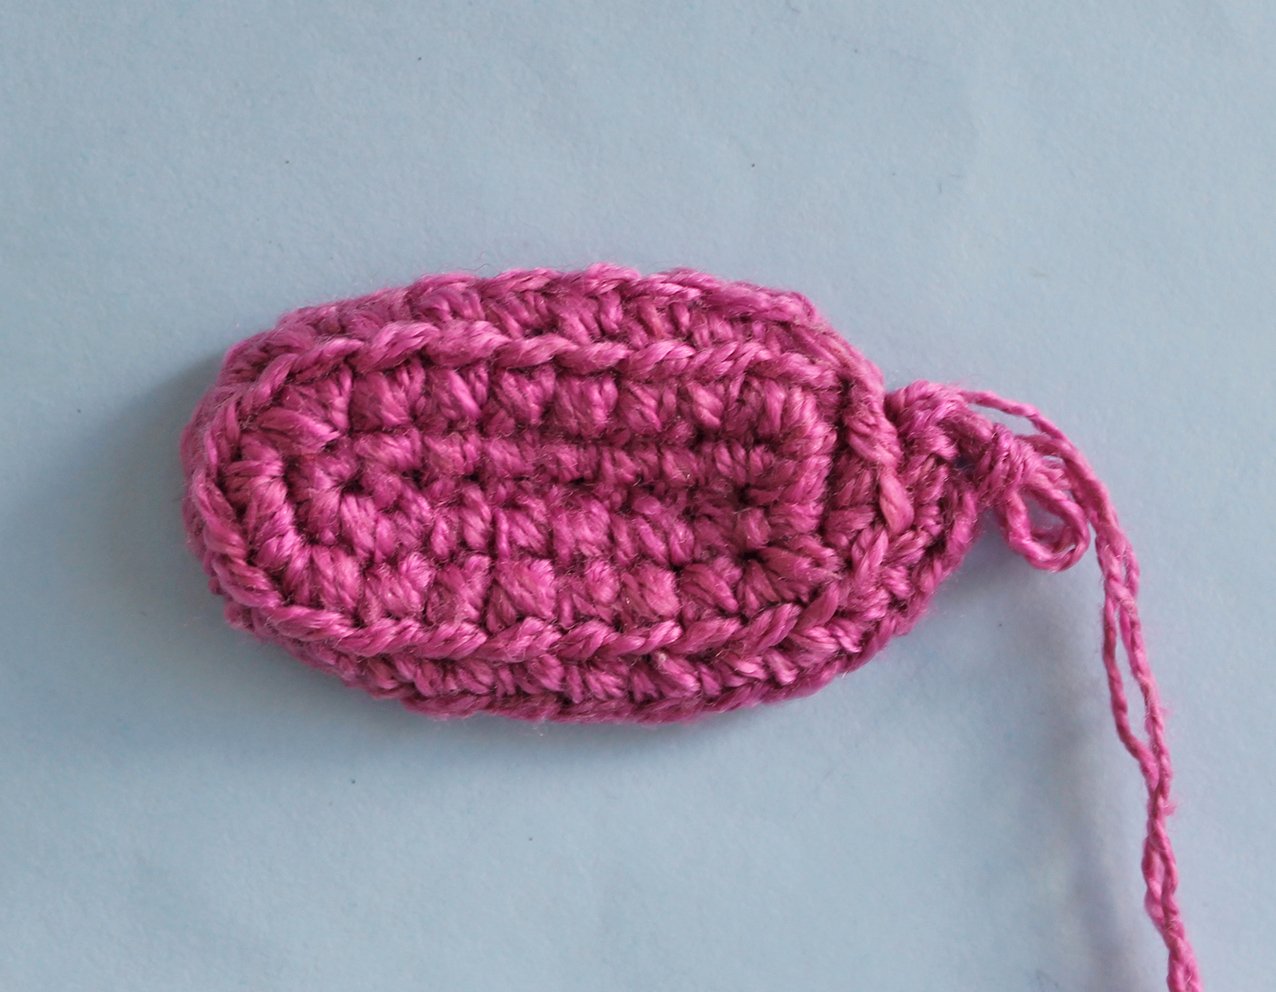
Use any coloured yarn.
Work 9 ch
Rnd 1. starting from 2nd ch from hook: 7 sc, 3 sc in the last stitch, continue along the other side of chain: 6 sc, inc = 18
Rnd 2. inc, 6 sc, 3 inc, 6 sc, 2 inc = 24
Work 1 sl st, transfer your place marker here.
Rnd 3. into the back loops only: 24 sc
Rnd 4-5. (2 rounds) 24 sc
Rnd 6. (10 sc, dec)х 2 times = 22
Rnd 7-8. (2 rounds) 22 sc
Rnd 9. (9 sc, dec)х 2 times = 20
Rnd 10-11. (2 rounds) 20 sc
Row 12. 10 sc, 1 ch, turn = 10
Row 13-15. (3 row) 9 sc, 1 ch, turn = 9
Row 16. inc, 7 sc, inc, 1 ch, turn = 11
Row 17. 11 sc, 1 ch, turn = 11
Row 18. 5 sc, 4 ch, skip 1 loop (this is a button loop), 5 sc = 10+4ch
Fasten off, cut off any excess yarn, hide the end.
Straps for a school bag
Work 45 ch
Rnd 1. starting from 2nd ch from hook: 16 sc, 2 inc, 1 sc, 3 ch, skip 6 loops, 1 sc, 2 inc, 16 sc = 42+3 ch
Fasten off, cut the thread, leaving long tail for sewing.
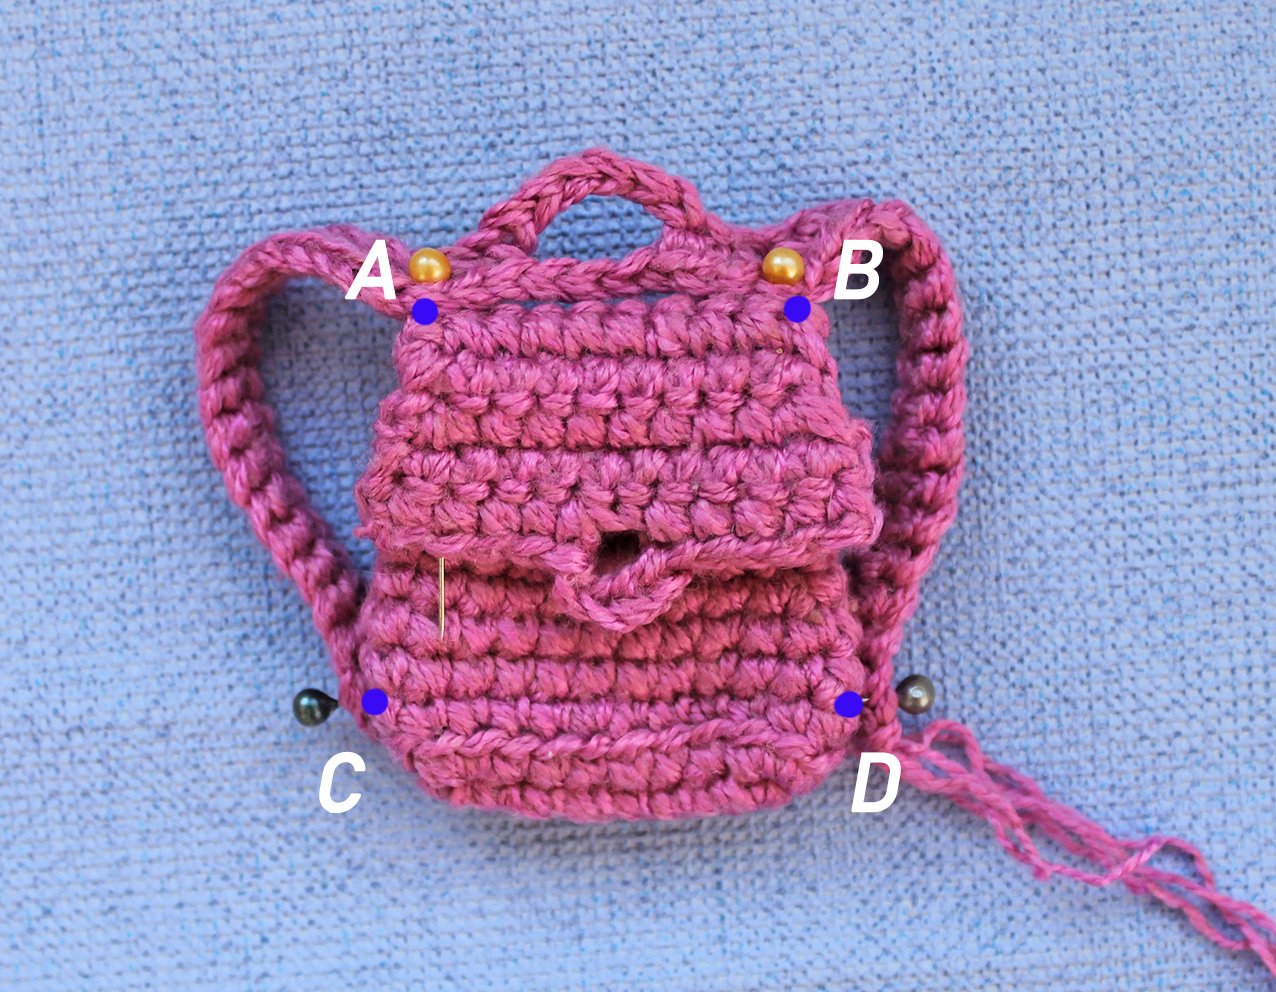
Attach the straps to the school bag. Sew from point A to B, and at points C and D.
Sew a button.
Put miniature notebooks and pencils in the school bag. Put a school bag on a giraffe.
Bouquet, base.
Work with green colour yarn.
Rnd 1. 6 sc in a Magic Ring
Rnd 2. (3 sc in 1 loop, 1 sc)х 3 times = 12
Rnd 3. 1 sc, (3 sc in 1 loop, 3 sc)х 2 times, 3 sc in 1 loop, 2 sc = 18
Rnd 4. 2 sc, (3 sc in 1 loop, 5 sc)х 2 times, 3 sc in 1 loop, 3 sc = 24
Rnd 5. (3 sc, 2 inc, 2 sc, inc)х 3 times = 33
Rnd 6. (4 sc, 2 inc, 4 sc, inc)х 3 times = 42
Rnd 7. into the back loops only: (4 sc, 2 dec, 4 sc, 1 dec)х 3 times = 33
Rnd 8. (3 sc, 1 dec, 4 sc, 1 dec)х 3 times = 27
Rnd 9. 4 sc, dec, (7 sc, dec)х 2 times, 3 sc = 24
Rnd 10. (3 sc, dec, 3 sc)х 3 times = 21
Rnd 11. (2 sc, dec)х 5 times, 1 sc = 16
Stuff a little.
Rnd 12. (2 sc, dec)х 4 times = 12
Rnd 13. 12 sc
Rnd 14. (dec, 1 sc)х 4 times = 8
Rnd 15-16. (2 rounds) 8 sc
Rnd 17. 1 dec, 6 sc = 7
Rnd 18-20. (3 rounds) 7 sc
Pull off the loops. Cut the thread, hide the end.
Roses (make 3)
Work with pink or red colour yarn.
Work 29 ch
Row 1. starting from 3rd ch from hook: (2 hdc in 1 loop)х 2 times, next, crochet a petal: 2 hdc in 1 loop, (3 dc in 1 loop) х 3 times, 2 hdc in 1 loop, crochet 4 more petals to the end of the chain
Fasten off, cut the thread, leaving long tail for sewing.
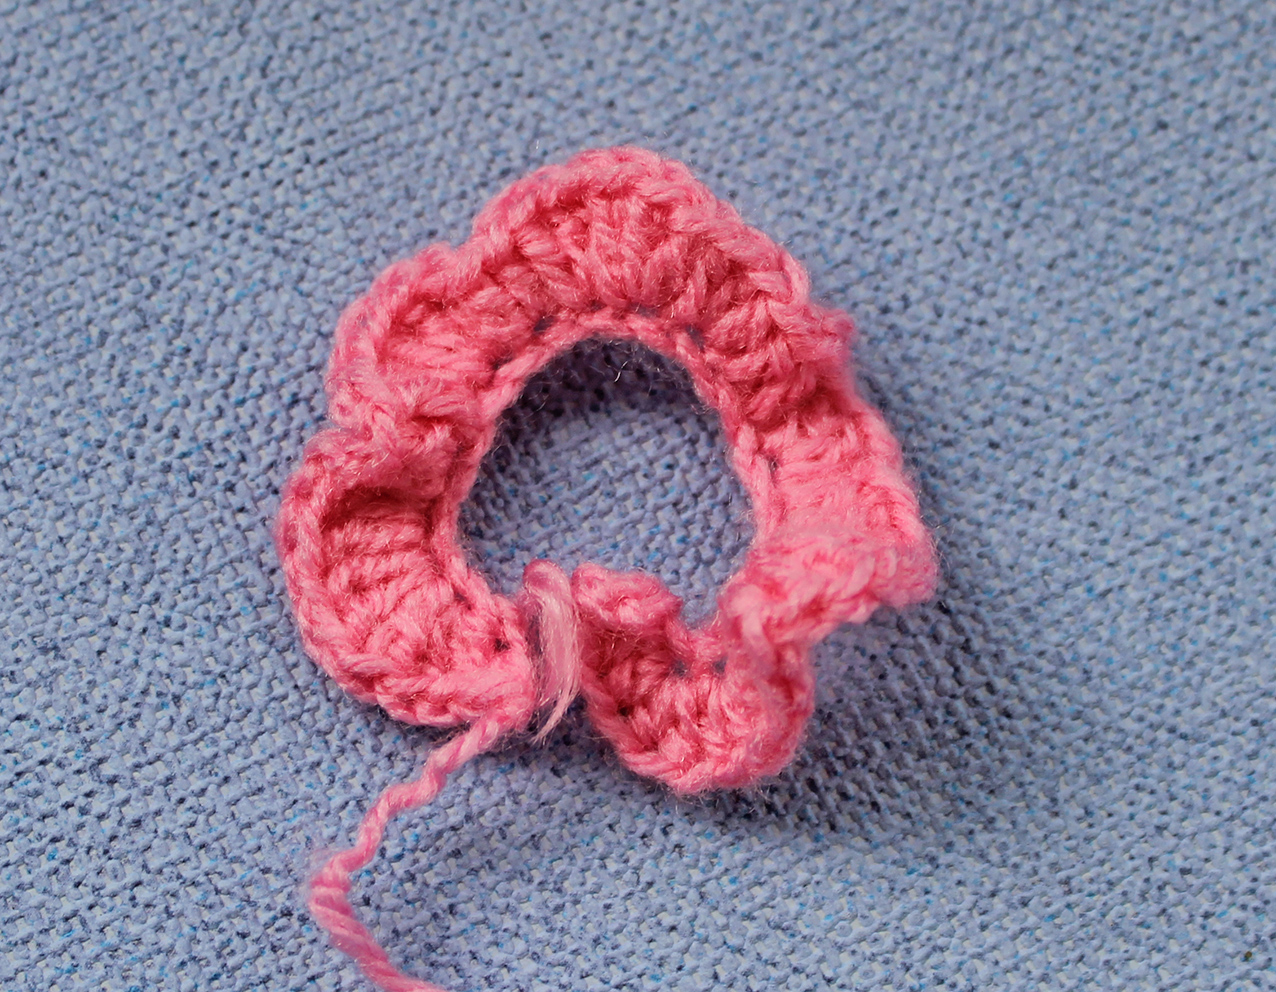
Form roses. Roll the part, sew through Rnd 1 a few times, make sure you pierce through all layers of the part.
Sew roses to the base. Decorate the bouquet as you wish.
Fix the bouquet to the arm with a piece of wire (or sew it on).
Giraffe schoolboy is complete!
.JPG)
.JPG)
.JPG)
.JPG)
.JPG)
.JPG)
.JPG)
.JPG)
.JPG)
.JPG)
.JPG)

.JPG)
.JPG)
.JPG)
.JPG)
.JPG)
.JPG)
.JPG)
.JPG)

.JPG)
.JPG)
.JPG)
.JPG)
.JPG)
.JPG)
.JPG)
.JPG)
.JPG)
.JPG)
.JPG)
.JPG)
.JPG)
.JPG)
.JPG)
.JPG)
.JPG)
