Today, we're crocheting an adorable pink kitten with lovely eyes and a heart on its belly. It stands approximately 25 cm tall, though its size may vary depending on the yarn thickness. The kitten's arms and legs are attached with thread, while the body is crocheted directly onto the head. Have fun and enjoy the crocheting process!

Here you’ll find all the materials needed for your cat. Feel free to choose the wool that suits your preferences: fluffy, chenille, cotton, or blended wool—whatever you love best! Just keep in mind: the thicker the wool, the greater the amount required.
Materials:
- 80 gr. Pink yarn: Sheep Woolly Hugs 50g/ 110m
- 20 gr. White yarn: Sheep Woolly Hugs 50g/ 110m
- Yarn for clothes: On line „FELIZIA“ 50g/100m
- Crochet hook 2.75 mm
- Eyes 10-12mm, eyelashes, nose
- Fiberfill
- Glue (Hobby Pattex)
- 1 Long needle for tightenings
- Buttons
Abbreviations:
sc - single crochet
Ch - chain
Inc - increase, crochet 2sc in one stitch
dec - decrease, crochet 2sc together
3 sc in 1 - crochet 3sc in one stitch of the previous row
3 sc tog - crochet 3sc together
X dec - decreasae x-times
X inc - increase x-times
(-)x - repeat in brackets x-times
Sl st - slip stitch
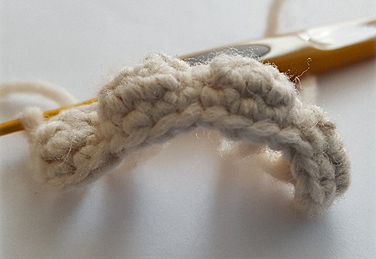
Marker and shift stitch.
To follow the beginning of the rounds I use a contrast thread as the marker while crocheting the toys and dolls. While crocheting in the spiral round, the beginning of the row is shifted to the right. For example, photo number 1. The alignment of the marker is necessary so that the proportions of the toy remain symmetrical, the increases and decreases remain in their place. To do this, every 2-3 rounds (depending on the thread and your gauge), crochet 1 more sc at the end of the round. Please note that we do not make the additional increases, but only move the marker so that it runs straight. It turns out that the first stitch of the next round becomes the last in the crocheted round. And the second stitch of the next round becomes the first one for this round. The shift stitch is not included in the total stitch count
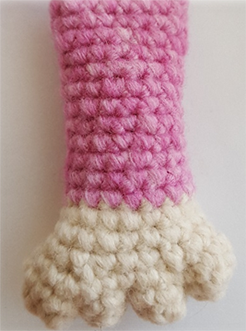
Front paws
First, crochet the toes. Start with white yarn.
Fingers (4)
Chain 4, from the second chain from the hook crochet around the whole chain
1. 1 sc, 3 sc in one, 1 sc, 3 sc in one (8) cut the thread and weave in the end.

Joining fingers
1. Take the first finger and crochet 4 sc, 4 sc on the second finger, 4sc on the third finger, 8 sc on the fourth finger, 4 sc on the 3 rd, 4 sc on the 2nd, 4 sc on the first (32)
Place the marker.
2. 3sc, 1dec, (2 sc, 1 dec)x 2, 6 sc, 1 dec, (2 sc, 1 dec)x 2, 3 sc (26)
3. 2 sc, 3 sc tog, 3 sc, 3 sc tog, 4 sc, 3 sc tog, 3 sc, 3 sc tog, 2 sc (18)
4. 18 sc
.png)
5. Change the colour, 18 sc
6. 7 sc, 1 dec, 7 sc, 1dec (16)
7-16. 16 sc, stuff the detail
17. 8 dec, close the hole, fasten off, hide the loose end.
The toes are now pointing in different directions. To enhance their appearance, you might consider the following:
Take the needle with a thread, pull in through all four fingers and pull the needle out from the other side. Skip one stitch and pull the needle back through the fingers. Tighten a bit, so that fingers were not apart from each other. Cut the thread, hide the end.
.jpg)
.jpg)
.jpg)
Embroider the 5th finger between 4 and 5 rows of the palm.
.jpg)
.jpg)
The front paws are finished.
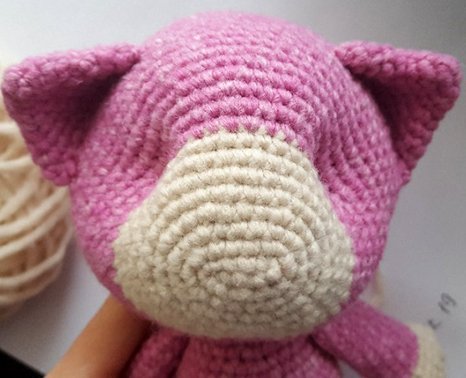
Head
Start crocheting from the muzzle. Start with white wool.
Crochet 6 ch, from the 2 loop from the hook
1. 3 sc, 3 sc in 1, further crochet along the other side of the chain 3 sc, 3 sc in 1 (12)
2. 3 sc, 3 inc, 3 sc, 3 inc (18)
3. 3 sc (1 inc, 1 sc)x 3, 3 sc (1 inc, 1 sc)x 3 (24)
4. 3 sc (1 inc, 2 sc)x 3, 3 sc (1 inc, 2 sc)x 3 (30)
5. 3 sc (1 inc, 3 sc)x 3, 3 sc (1 inc, 3 sc)x 3 (36)
6. 3 sc (1 inc, 4 sc)x 3, 3 sc (1 inc, 4 sc)x 3 (42)
7-8. 42 sc
9. Crochet 4 sc,
.jpg)
Chain to the pink colour.
*beginning of a new row, move the marker in the middle and mark the new beginning of the round. This way
it will be easier for us to distribute the increases at the sides and make sure that the increase goes over the increase.
10. (1 inc, 3 sc)x 10, 2 sc (52)
11. 6sc, (1 inc, 3 sc)x 3, put the marker A, (1 inc, 3 sc)x 4, put the marker B, (1 inc, 3 sc)x 3, 6 sc (62)
12. 62 sc
13. 6 sc, (1 inc, 4 sc)x 3, put the marker D, (1 inc, 4 sc)x 4, put the marker C, (1 inc, 4 sc)x 3, 6 sc (72)
14- 24. 72 sc
25. 6 sc, (1 dec, 4 sc)x 10, 6 sc (62)
26. 6 sc, (1 dec, 3 sc)x 10, 6 sc (52)
27. 52 sc
28. (11 sc, 1dec)x 4 (48)
29. (6 sc, 1 dec)x 6 (42)
30. (5 sc, 1 dec)x 6 (36)
31. (4 sc, 1 dec)x 6 (30)
Stuff the head, but do not close the hole yet (so that you could attach the safety eyes).
.jpg)
Body ( pink)
For the body, crochet 24 single crochet stitches (sc) in a circle at the base of the head.
If this method seems challenging, there's an alternative: Start with 24 chain stitches, connect them into a circle, and crochet an additional round of 24 single crochet stitches.
Afterward, proceed with the instructions starting from round 1. Finally, sew the body and head together.
.jpg)
1- 2. 24sc
3. (3 sc, 1inc)x 6 (30)
4. (4 sc, 1 inc)x 6 (36)
5- 6. 36 sc
7. (5 sc, 1 inc)x 6 (42)
8. (6 sc, 1 inc)x 6 (48)
9. (7 sc, 1 inc)x 6 (54)
10-17. 54 sc
18. (7 sc, 1dec)x 6 (48)
19. 48 sc
20. (6 sc, 1 dec)x 6 (42)
21. (5 sc, 1 dec)x 6 (36)
22. (4 sc, 1 dec)x 6 (30)
23. (3 sc, 1 dec)x 6 (24) stuff
24. (2 sc, 1 dec)x 6 (18)
25. (1 sc, 1 dec)x 6 (12)
26. 6 dec. Fasten off, cut and hide the loose end.
Sew the paws to the body, between rows 2 and 3.
.jpg)
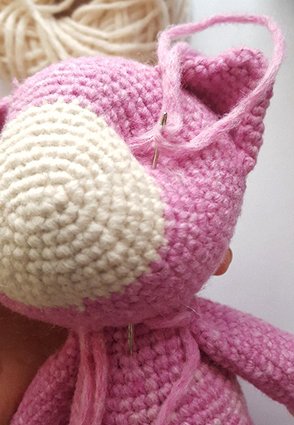
For the eyes: Find the markers for the tightening of the eyes and smile in the 11 and 13 rounds.
Insert the needle at marker A and bring it out at marker B on the opposite side. Move two rounds upward, then insert the needle at marker C from marker B, and return to the opposite side at marker D. Pull the yarn tight and secure it with a knot.
.jpg)
.jpg)
.jpg)
.jpg)
Crocheting the ears.
1. 6 sc in a magic ring
2. 6 inc (12)
3- 4. 12 sc
5. (1 sc, 1 inc)x6 (18)
6. (2 sc, 1 inc)x6 (24)
7. (3 sc, 1 inc)x6 (30)
Go 8 rows up from the eyes' tightenings and sew the ears.

Insert the hook under the chin and bring it out at marker C. Move two stitches down to the left, insert the hook again at marker B, and bring it back down, exiting under the chin. Pull the yarn tight and secure it with a knot. Refer to the pictures for guidance.
Repeat the same process for the second eye: Insert the hook under the chin and bring it out at marker D. Move two stitches down to the right, insert the hook again at marker A, and bring it back down, exiting under the chin. Pull the yarn tight and secure it with a knot. Follow the pictures for detailed instructions
.jpg)
.jpg)
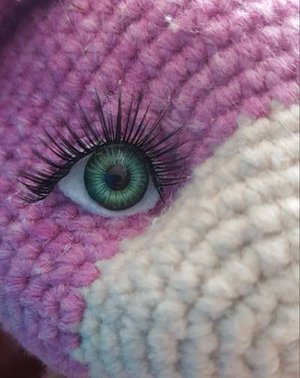
Cut two ovals from the felt, make holes in the middle, so that you cut insert there safety eyes. Insert eyes with the felt into the places where you've just made the tightenings and fasten them off.
You can use doll's eyes as an alternative. Begin by cutting the felt and gluing it onto the face, then attach the doll's eyes to the felt. Next, glue the lashes above the eyes, followed by the eyelashes. To finish, needle-felt the eyelids carefully. !!! Note: This is not suitable for babies, so handle with caution !!!


Finish crocheting the head.
32. (3 sc, 1 dec)x 6 (24)
33. (2 sc, 1 dec)x 6 (18)
34. (1 sc, 1 dec)x 6 (12)
35. 6 dec, fasten off, hide the loose ends.
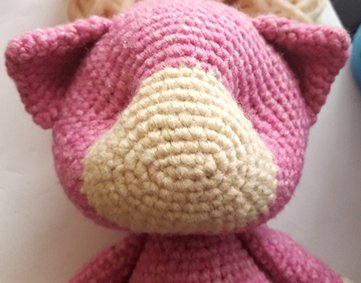
Nose:
Embroider the nose, starting with the first row of the head, then go 5 rows up, and back again. When you go back down - always insert your needle into the same place. After you've embroidered the nose go 6 rows lower. In the place of a mouth insert a needle and pull it at the top. Tighten and repeat one more time. Fasten off and hide the loose ends.
Take some felting wool and needle-felt the lower lip.
You can crochet a stripe consisting of 5 stitches. To do so, chain 6 and then work 5 single crochet stitches, beginning from the second chain stitch from the hook. Once finished, secure the yarn and cut it. Finally, attach the stripe by sewing it to the designated spot at the base of the mouth.

.jpg)
Embroider the eyebrows.
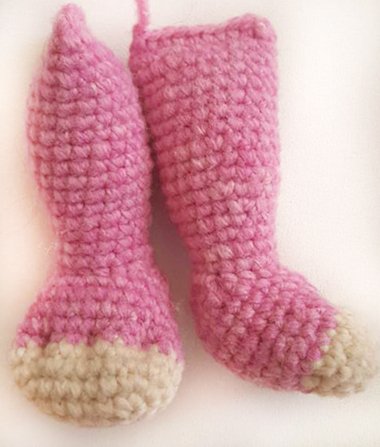
Back paws
First, crochet the foot. Start with white yarn.
Chain 6, from the second chain from the hook
1. 5 sc, 3 sc in 1, further crochet along the other side of the chain 5 sc, 3 sc in 1 (16)
2. 5 sc, 3 inc, 5 sc, 3 inc (22)
3. 5 sc (1 sc, 1 inc)x 3, 5 sc (1 sc, 1 inc)x3 (28)
4. 28 sc, change to the main colour.
5- 6. 28 sc
7. 5 sc (1 sc, 1 dec)x3, 5 sc (1 sc, 1 dec)x3 (22)
8- 9. 22sc
10. 5 sc, 3 dec, 5 sc, 3 dec (16)
8 dec, fasten off, hide the loose ends.
Crochet 15 single crochet stitches (sc) on the foot in a circle. Alternatively, you can follow the same steps as described for the body.
If this method seems challenging, there is another option: Start by casting on 15 chain stitches, join them to form a circle, and crochet an additional round of 15 single crochet stitches.

1- 2. 15 sc
3. 6 sc, 1 inc, 7 sc, 1 inc (17)
4. 17 sc
5. 7 sc, 1 inc, 8 sc, 1 inc (19)
6. 8 sc, 1 inc, 9 sc, 1 inc (21)

7- 16. 21 sc
Sew together the sides.
Tightenings to make fingers.
On the sole mark points A, B, C between rows 4 and 5. See the photo Go one row above and mark there points A1, B1, C1. From below the foot insert the needle into point A and pull it back through point A1. Repeat the same for points B and C. Tighten, fasten off and hide the ends.


Sew the legs between rows 16 and 17.
Embroider the heart on the tummy.
Tail
1. Chain 10 and join in a circle.
2- 29. 10 sc Sew the tail to the 16 row.
The cat is finished. This wool is easy to comb with a dog brush. So I combed it thoroughly and ended up with a wonderfully fluffy cat.