.jpg)
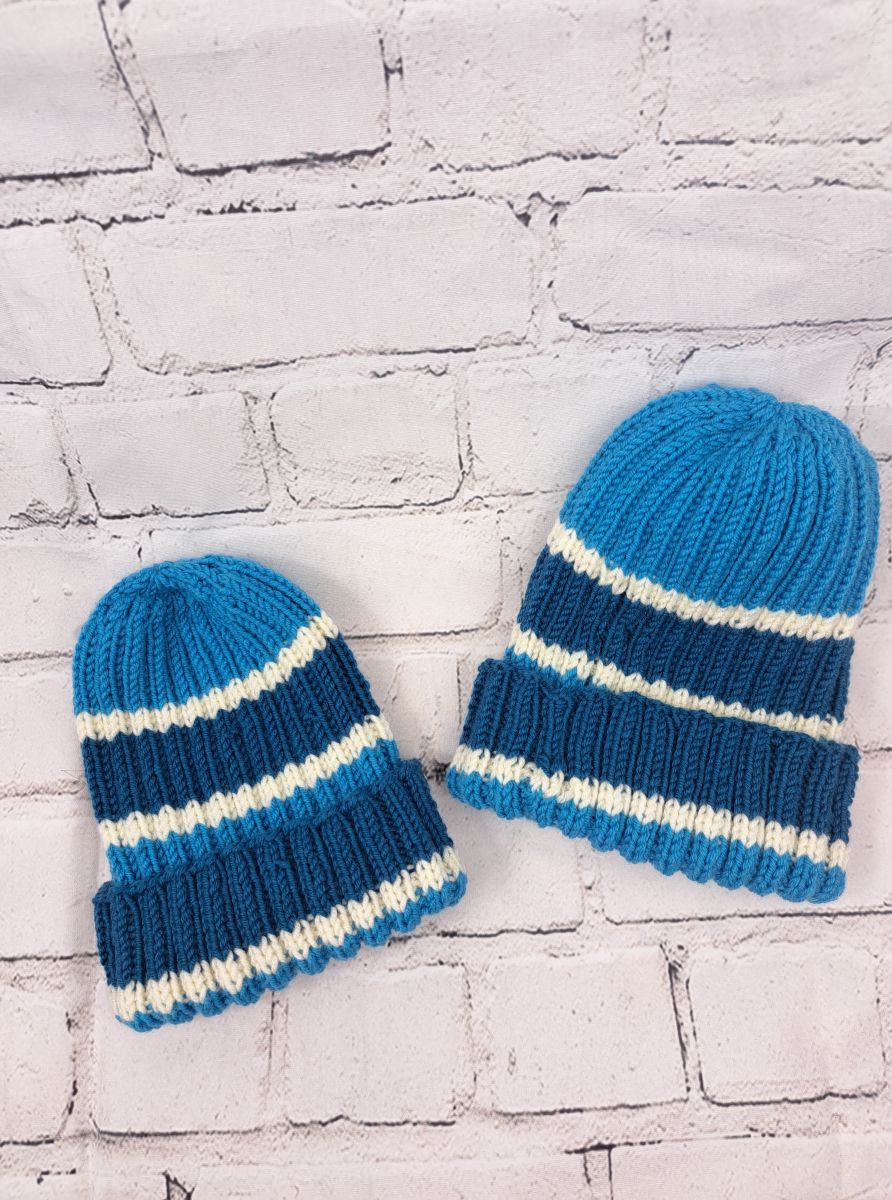
As the temperatures begin to drop here in Ireland, it's that time of year again when wearing a warm hat outside becomes essential. My boys have both outgrown their old hats, and my eldest has expressed his wish for a matching hat with his baby brother.
I took my older son upstairs to my yarn stash, where he could choose the colours for the new hats. He insisted on making the hats identical, refusing to let me swap or change the colour pattern in any way.
The hat is knitted in a simple 2 knit 2 purl rib stitch pattern, making it especially stretchy. I made it extra-long to ensure there’s enough length to fold over for added warmth and style.
Sizes (all approximate)
For the fold-over cuff, I added about 4 cm in length for newborns to 9-month-old babies and about 6 cm for all other sizes.
Age, Circumference x Length
Newborn: 37 cm x 16.5 cm
1 Month: 39 cm x 17 cm
3 Months: 41 cm x 17.5 cm
5 Months: 43 cm x 18 cm
7 Months: 45 cm x 19 cm
9 Months: 47 cm x 19.5 cm
12 Months: 49 cm x 22 cm
2 Years: 51 cm x 23 cm
3 – 6 Years: 53 cm x 23.5 cm
7 – 8 Years: 54 cm x 24 cm
9 – 14 Years: 57 cm x 25 cm
Adults:
XS: 53 cm x 23.5 cm
S: 55 cm x 24.5 cm
M: 57 cm x 25.5 cm
L: 59 cm x 26.5 cm
XL: 61 cm x 27.5 cm
XXL: 63 cm x 28.5 cm
Before we begin, we need to do a gauge swatch:
For my hat project, I decided to use a 3 mm knitting needle along with a 100% extra-soft wool yarn in DK weight. The yarn comes with a length of 105 meters per 50 grams, making it ideal for a cosy, warm hat with a nice, smooth texture.
To figure out the gauge, I knitted a square sample by casting on around 30 stitches and working 40 rows in the pattern of 2 knit, 2 purl stitches.
This stitch pattern not only provides a snug fit but also makes the hat especially stretchy, so it can accommodate various head sizes comfortably.
After knitting the sample square, I measured how many stitches and rows I needed to cover 10 cm. Since this stitch pattern is very elastic, it’s important to stretch the fabric a while measuring to get a realistic gauge that reflects how the hat will fit when worn, otherwise the hat will be way too big.
My gauge ended up being 20 stitches x 32 rows per 10 cm.
.jpg)
Calculate the Cast on:
I knitted a hat for each of my two boys: the older one is 6 years old, and the little one is now 11 months. For the sizing, I used the guidelines listed above, which I chose after thorough research.
My older son’s head circumference is 53 cm, and the younger one’s is 49 cm. I calculated these measurements based on my gauge:
Gauge: 10 cm = 20 stitches
Per cm: 2 stitches
So the calculations are:
For a 53 cm circumference: 53 cm x 2 = 106 stitches
For a 49 cm circumference: 49 cm x 2 = 98 stitches
Since I slightly stretched the swatch to measure, I haven’t subtracted any cm here, which I might normally do for a less stretchy pattern.
The pattern itself requires a stitch count divisible by 4. This makes it easy to adjust the stitch count as needed:
For the larger hat, I cast on 104 stitches, and for the smaller hat, I cast on 96 stitches
Let’s Start with the knitting
I always knit the hats in the round. You can also knit them flat and sew them together at the end, but I find that less practical.
For my hats, I used three different colours: I knitted 10 rows in dark blue, 3 rows in white, 22 rows in light blue, 3 more rows in white, and then repeated this pattern from the beginning.
This way, you can continue knitting for quite a while until just before starting the decreases.
Calculate the Decreases:
Here, I chose a simple decrease method that spans 8 rows. To determine how long you can knit straight up before starting the decreases, you should quickly calculate how many centimetres these 8 rows cover based on your own stitch gauge.
My stitch gauge results:
32 rows = 10 cm
1 row = 0.3125 cm
8 rows = 2.5 cm
This means I need to start decreasing 2.5 cm before reaching the desired height.
For the larger hat, I wanted a height of 23.5 cm, so I began decreasing at 21 cm. For the smaller hat, I aimed for a height of 22 cm, so I started decreasing at 19.5 cm.
I worked the decreases as follows:
Row 1:
Knit 2 stitches, then knit 2 stitches together. Repeat this until the end of the round.
Row 2:
Knit 2 stitches, purl 1 stitch. Repeat this until the end of the round.
Row 3:
Knit 2 stitches together, then purl 1 stitch. Repeat this until the end of the round.
Row 4:
Knit 1 stitch, purl 1 stitch. Repeat this until the end of the round.
Row 5:
Knit 2 stitches together, then knit 1 stitch. Repeat this until the end of the round.
Row 6:
Knit all stitches.
Row 7:
Knit 2 stitches together, then knit 1 stitch. Repeat this until the end of the round.
Row 8:
Knit 2 stitches together, then knit 1 stitch. Repeat this until the end of the round.
You can add more decreases if desired. To do so, simply repeat the 8th row as many times as needed until you reach your desired number of stitches. Keep in mind that the hat will become slightly longer as a result. However, since the edge of the hat is folded up, this won’t make much of a difference.
Cut the yarn (not too short), thread the remaining stitches onto a darning needle, pull the stitches tight, and secure all ends.
I hope you enjoyed this pattern! If you made it and loved the result, feel free to leave a comment. You can find more of my free patterns on my blog at Crazypatterns.


