Belly Band Sewing Tutorial
Pregnancy is a wonderful time in a woman's life, filled with anticipation, planning, and of course, physical changes. As the body adjusts to the growing needs of the baby, many expectant mothers seek comfortable and supportive clothing to gently accommodate their expanding belly. A belly band can be the perfect solution – it provides support, relieves the back, and adds extra comfort. But the benefits of a belly band extend far beyond mere comfort.
A self-sewn belly band allows you to continue wearing your existing tops, even if they become too short as your belly grows. This way, you don't need to invest in expensive and often unattractive maternity wear. Instead, you can tailor your belly band to fit your body perfectly and use beautiful fabrics and materials. This not only saves money but also conserves resources by allowing you to keep using your existing wardrobe.
By customizing your belly band, you can incorporate your personal preferences and create a unique garment that makes your pregnancy even more special. In this blog post, we will show you how to easily sew a belly band yourself. Let's get the sewing machine ready and get creative together!
(6).png)
Required Materials:
- Stretchy fabric (e.g., jersey, viscose) approximately 50 cm x 140 cm
- Thin elastic band, 0.7 cm wide or whatever is available
- Matching sewing thread and a sewing machine
- Measuring tape
Note: Since the presser foot pressure on my sewing machine cannot be adjusted, I always use a walking foot when sewing elastic fabrics. This helps transport the fabric evenly without stretching and puckering it during sewing.
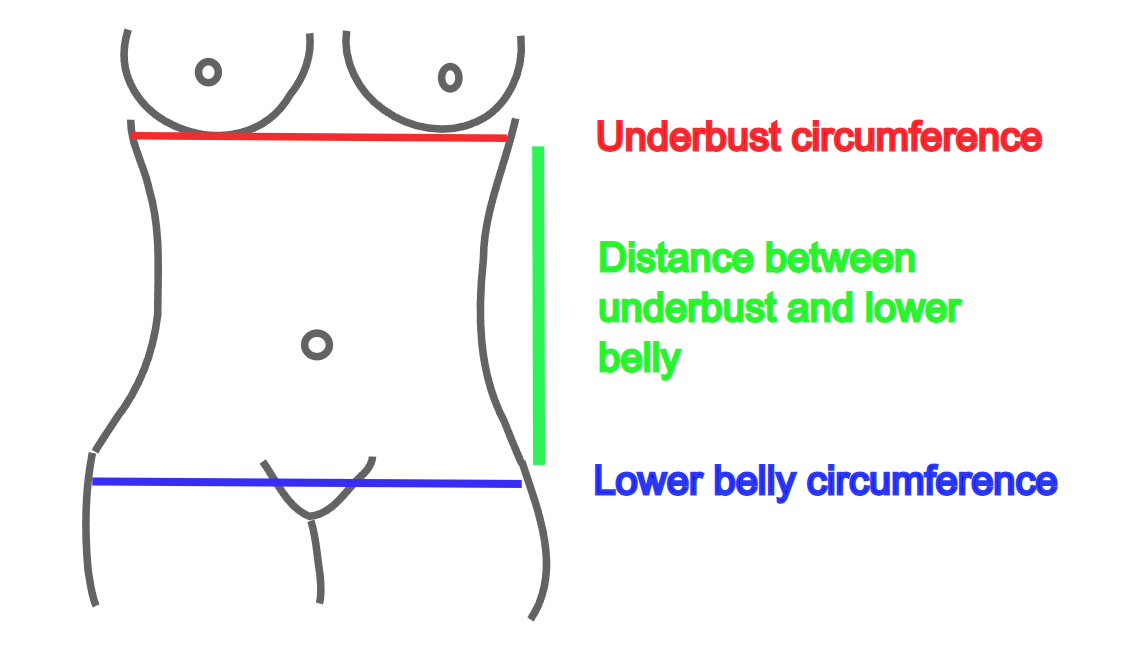
To tailor the belly band to fit you perfectly, you first need to take three measurements:
1. Underbust circumference: This measurement is taken directly under the bust. The measuring point is at the narrowest part of the torso, right under the bust.
2. Lower belly/hip circumference: This measurement is taken at the widest part of the lower belly or hips. This spot is usually around the hip bones. Depending on how long you want your belly band, you can adjust this value accordingly.
3. Distance between underbust and lower belly: This is the vertical distance between the underbust circumference measurement point and the lower belly/hip circumference measurement point. Make sure to take this measurement at the side of the body, not over the belly!
The image illustrates where each measurement point is located exactly:
For the construction of the pattern pieces, it depends on the exact type of fabric you are using:
Jersey is usually stretchy only in width (i.e., across the grainline), whereas viscose or viscose blend fabrics are often bi-elastic. To determine how your fabric behaves and which of the two calculation methods you should use, gently pull your fabric both in width and length (along the grainline).
Cutting:
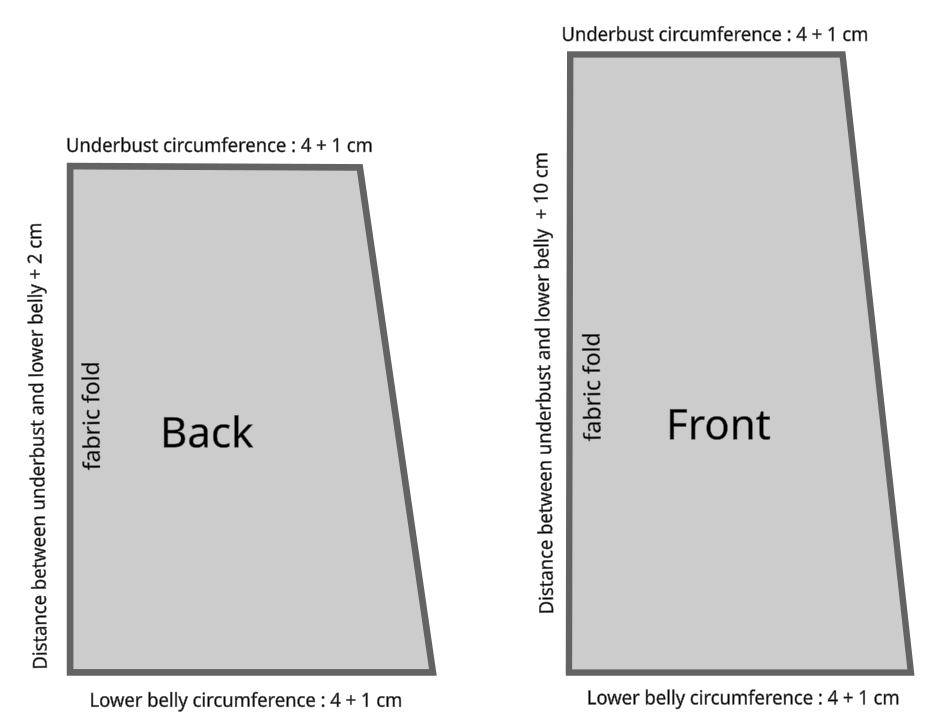
Option 1: Mono-elastic (stretchy in width)
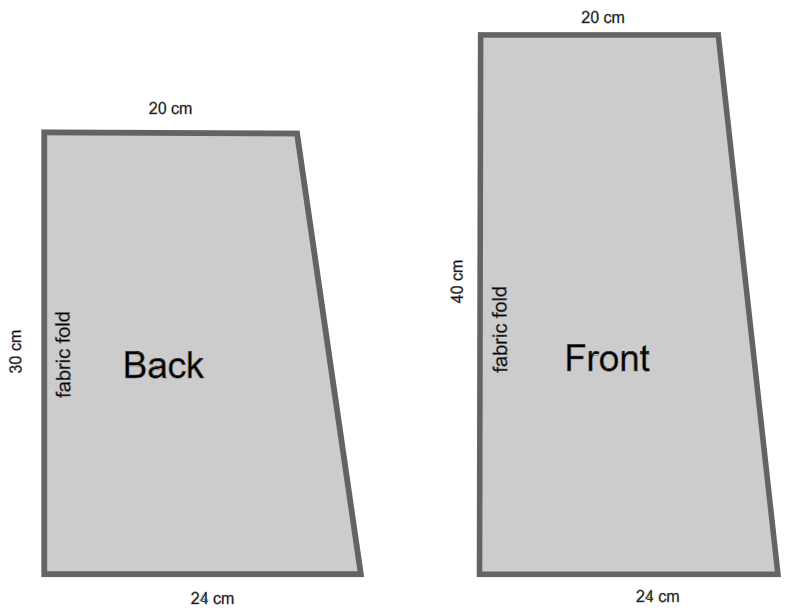
For a fabric that is stretchy in width, you will need the pattern piece for the back and the belly with the following dimensions:
Example with Real Measurements:
To give you a clear idea, here is an example with the measurements I took:
-
Underbust circumference: 80 cm
-
Lower belly circumference: 95 cm
-
Height: 28 cm
Note: I made this belly band when I was already in the 8th month and had quite a prominent bump ;) If you have a smaller belly, adjust the height of the belly piece accordingly, for instance, add only 10 cm instead of 15 cm. It’s also helpful to measure the distance between the underbust circumference and lower belly circumference across the bump.
From these measurements, the following pattern pieces are derived:
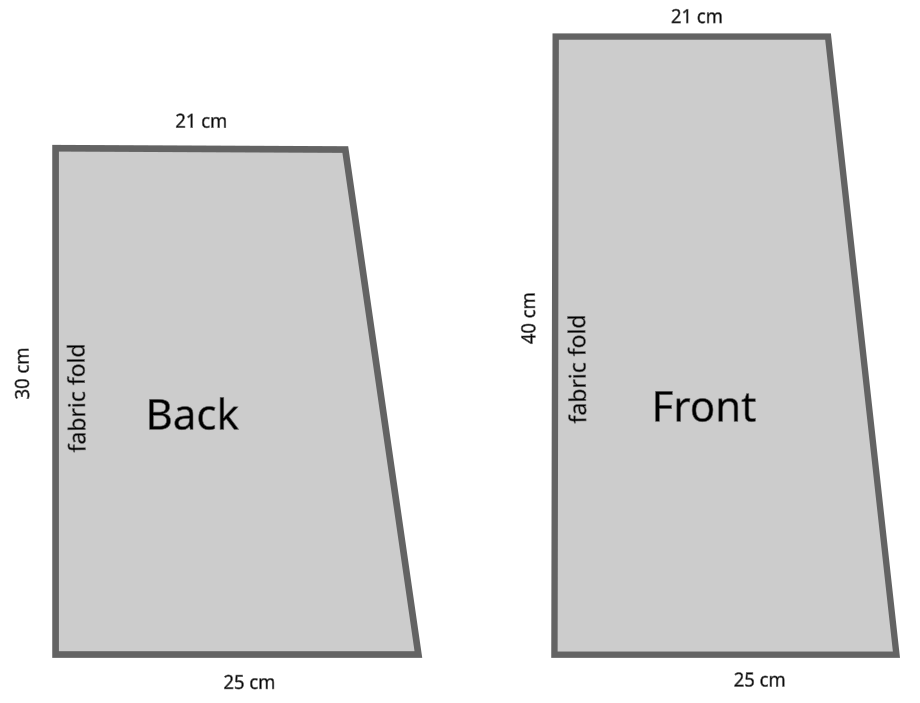
Since quartering the lower belly measurement resulted in an uneven value, I simply rounded it up to the next whole number.
Option 2: Bi-elastic (stretchy in both length and width)
For a fabric that is stretchy in both width and length, you will need the pattern pieces for the back and the belly with the following dimensions:
.png)
In comparison to the mono-elastic fabric, I simply omitted the seam allowance in the width when cutting and reduced the height of the belly piece.
With my measurements (underbust circumference: 80 cm, lower belly circumference: 95 cm, height: 28 cm), the following values for the pattern pieces result:
Sewing Together:
Now, place the belly piece and the back piece right sides together. Make sure that for both pieces, the underbust circumference is at the top and the lower belly circumference is at the bottom. Secure the underbust circumference of both pieces together with clips.
.png)
Now you can see how far the abdominal piece needs to be gathered. For gathering, I always use just needle and thread and sew with a long basting stitch along both sides. To ensure the gathering sits exactly where the abdomen really needs it later on, I leave about 10 cm of space from the upper edge (underbust circumference) before I start gathering, and about 5 to 7 centimeters from the bottom. Once the individual folds are evenly distributed, I secure them with clips or pins and sew them firmly with a straight stitch or with the overlock.
.png)
The two upper pictures show the gathering in viscose. Since less material needs to be gathered here, it is hardly noticeable.
The lower pictures show the gathering again with jersey; the gathering is much stronger here.
.png)
If you are sewing with a regular sewing machine, it's not necessary to finish the edges again, as both jersey and viscose do not fray.
After connecting the front and back pieces, I recommend hemming both the top and bottom edges.
For the bottom hem (underbelly), simply fold the fabric one centimeter to the inside and sew it down with a zigzag stitch or another elastic stitch.
Now, you need to determine the length of your elastic band. I used a 0.7 cm wide elastic band here, as it provides enough support without being too tight. I wrapped it around my underbust and adjusted the tension to what feels comfortable for the belly band later. Since elastic bands vary in elasticity, feel free to experiment with this.
You can sew the top hem in two ways. (Note: If you've chosen a wider elastic band, you'll need to fold more fabric in both variations!)
Option 1: Again, fold the fabric about 1 cm to the inside and sew it down with a zigzag stitch, but leave about a 3 cm opening. Thread the prepared elastic band through the fold using a safety pin, ensuring to secure one end so the elastic doesn't disappear completely inside ;) Once you've threaded it through, sew both ends of the elastic together with a few stitches, and then close the opening of the hem with a zigzag stitch.
.png)
On the left, you see the belly band without elastic, and on the right, with elastic.
Option 2: Here, the elastic is sewn directly onto the inside of the upper edge with a zigzag stitch, while pulling it slightly. Start by marking the elastic at its midpoint - this midpoint should be evenly distributed from side seam to side seam - to ensure the gathering is evenly distributed along the entire length. When sewing, guide the elastic through the opening of the presser foot (as shown in the picture), ensuring not to stretch the fabric unintentionally.
.png)
After sewing the elastic all around with a zigzag stitch, fold it inward once and sew it again all around with another zigzag stitch. This method secures the elastic in place so it won't shift, and it also hides the elastic from the outside.
.png)
On the left side, you can see how the seam looks from the inside, and on the right side, how it appears from the outside.
And there you have it, you're done!
I hope you enjoyed this tutorial. If you have any questions or encounter any issues, please feel free to write them in the comments. I would also appreciate any positive feedback :)
Otherwise, have fun recreating this project! Feel free to explore my other free blog posts or take a look around my shop where you'll find many more sewing and crochet patterns for practical items or cute plush toys and amigurumi.